The 30-Minute DIY Guide to Garage Door Keypad Installation
The Fastest Way to Add Keyless Access to Your Garage
Installing a keypad for a garage door is one of the quickest weekend upgrades you can make to your home — and most homeowners finish the job in about 30 minutes with just a screwdriver and a drill.
Here’s the short version of how it’s done:
- Choose a compatible keypad for your garage door opener brand and model
- Mount the keypad on the exterior wall, about 5 feet off the ground, next to the garage door
- Insert batteries and secure the unit with screws
- Press the Learn button on your opener motor unit
- Enter your PIN on the keypad and confirm the sync
- Test the keypad to make sure the door opens and closes correctly
That’s the core process. The rest of this guide covers everything in between — choosing the right keypad, wiring, programming for different brands, and fixing common problems.
No more fumbling for your remote. No more hiding a spare key under the mat.
I’m Andrew Hopson from Matrix Garage Doors, and after years of helping Columbus homeowners with garage door opener installations and keypad replacements, I know exactly where DIYers get stuck when installing a keypad for a garage door — and how to make the process smooth from start to finish.

Simple installing a keypad for garage door glossary:
Understanding Keypad Types and Compatibility
Before you head to the hardware store or order a keypad online, you need to understand what will actually work with your specific garage door opener. If you buy an incompatible unit, you’ll find yourself locked out and frustrated.
| Keypad Type | Power Source | Installation Complexity | Best For | Security Level |
|---|---|---|---|---|
| Wireless (Modern) | Alkaline or Lithium-ion Batteries | Very Low (No wires, 2 screws) | 95% of modern homes | Very High (Rolling Codes) |
| Wired (Legacy/Aftermarket) | Hardwired to opener terminals | Moderate (Requires routing wires) | Pre-1993 openers or high-interference areas | Moderate to Low (Depends on opener) |
| Smart/Video Keypad | Rechargeable Lithium-ion battery | Low (App integration required) | Tech-savvy homeowners wanting visual monitoring | Extremely High (Video + App logs) |
When shopping, you’ll have to choose between brand-specific models and universal keypads. If you want to make sure you get the right fit, you can read our guide on how to Upgrade Your Access with a Replacement Garage Keypad or Remote. For official brand instructions, you can also consult Chamberlain Group Support: Keypad Programming and Installation.
Wired vs. Wireless Keypads
- Power Source: Wireless keypads typically run on standard 9-volt batteries or AAA batteries. High-end smart video keypads operate on rechargeable lithium-ion batteries. Wired keypads draw power directly from the garage door opener’s low-voltage power terminal or a plug-in transformer.
- Installation Complexity: Wireless models win by a landslide. You simply screw them into the exterior door frame. Wired models require routing low-voltage wires from the outside keypad, through the wall, and up to the opener motor unit.
- Signal Reliability: Wired keypads offer a virtually uninterrupted connection because they don’t rely on radio frequencies. However, modern wireless keypads use dual-frequency technology (like 315/390 MHz) to bypass local signal interference.
Brand-Specific vs. Universal Models
- Compatibility: Brand-specific keypads are manufactured by companies like LiftMaster, Chamberlain, or Genie to work exclusively with their own proprietary radio frequencies and encryption protocols. Universal keypads, such as the Skylink KN-1, are designed to mimic those frequencies, making them compatible with multiple brands.
- Frequency Matching: Modern garage door openers manufactured after 1993 utilize rolling code technology (such as Security+ 2.0 or CodeDodger). This means the security code changes every time you press the button, preventing tech-savvy thieves from grabbing your code out of the air. Older openers (pre-1993) rely on manual DIP switches, which are physical switches you toggle to match the code on your remote.
- Manufacturer Specs: If you have a modern smart setup, a specialized option like the myQ Smart Garage Video Keypad offers a 160-degree wide-angle view, vehicle detection, and integrates directly with LiftMaster, Chamberlain, Craftsman, Raynor, and AccessMaster openers built after 1993.
Step-by-Step Guide to Installing a Keypad for Garage Door
Ready to get to work? Installing a keypad for a garage door is an easy process when you take it step-by-step. If you are also looking to automate your entire entry system, check out our guide on The Easy Way to Automate Your Roll Up Garage Door.
Tools and Materials for Installing a Keypad for Garage Door
Before starting, clear a small workspace and gather these tools:
- Your new garage door keypad kit (including mounting screws)
- A drill with a 3/32-inch drill bit (and a masonry bit if mounting to brick or concrete)
- A standard Phillips-head screwdriver
- A tape measure
- A pencil
- A bubble level
- Safety glasses
- Fresh batteries (if not included in your kit)
For additional visual assistance on tool safety and prep, you can review the Home Depot: How to Install a Garage Door Keypad guide or read through How to Install a Garage Door Keypad: A Practical Guide for … .
Mounting the Keypad Unit
- Find the Perfect Location: Choose a spot on the exterior wall or door jamb at least five feet above the ground. This height keeps the keypad out of reach of curious toddlers and pets while remaining comfortable for adults. Ensure the location gives you a clear line of sight to the garage door but is out of the path of the door’s physical movement.
- Mark Your Holes: Hold the keypad (or its mounting bracket) against the wall. Place your bubble level on top of the unit to ensure it isn’t crooked. Use your pencil to mark the mounting screw locations through the holes.
- Drill Pilot Holes: Wearing your safety glasses, drill pilot holes at your pencil marks. If you are mounting to wood siding or a wooden door jamb, a standard wood bit is perfect. If you are mounting to brick, stucco, or concrete block, you must drill pilot holes with a masonry bit and insert plastic wall anchors first.
- Mount the Top Screw: Drive the top screw into the wall, leaving about 1/8 inch of the screw head protruding.
- Secure the Unit and Install Batteries: Slide the keypad’s top mounting slot over the protruding screw head so it hangs in place. Open the battery compartment at the bottom of the keypad, locate the lower mounting hole, and drive the second screw tightly into place. Finally, insert your batteries (usually a 9V battery or AAA batteries) and snap the battery cover shut.
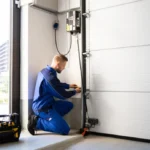
Programming the Opener After Installing a Keypad for Garage Door
To sync your newly mounted keypad with your overhead motor, you’ll need a sturdy stepladder to reach the opener unit. If you’re working with a brand-new setup, you might want to read our comprehensive overview of Garage Door Opener Installation first.
Follow these steps to program your keypad:
- Locate the Learn Button: Climb your ladder and locate the “Learn” button on your garage door opener’s motor unit. It is usually tucked behind the light cover on the back or side of the motor. The button is typically colored yellow, red, orange, green, or purple.
- Press the Learn Button: Press and immediately release the Learn button. Do not hold it down, as holding it for more than a few seconds can erase all your programmed remotes! A small indicator LED next to the button will light up and stay lit. This indicates the opener is now in “programming mode” for the next 30 seconds.
- Enter Your PIN: Step down from the ladder and walk over to your exterior keypad. Within that 30-second window, enter your chosen 3-to-8-digit PIN code (we recommend a secure 4-digit code).
- Sync the System: Press and hold the Enter button (or the Up/Down button, depending on your brand) on the keypad. Watch the overhead motor unit. The light bulb on the motor will flash twice, or you will hear two distinct clicks. This is your confirmation that the keypad and the motor are successfully paired.
- Test Your Work: Wait about 30 seconds for the programming mode to automatically close. Enter your PIN on the keypad and press Enter. The door should smoothly open or close.
If you are replacing an older system, you can find helpful instructions in this guide on DIY: How to Install a Garage Door Opener Keypad Quickly – Mnis .
Troubleshooting and Maintenance Tips
Like any outdoor electronic device, a garage door keypad can run into occasional issues. If your keypad stops working suddenly, don’t worry — most fixes are quick and inexpensive. For an in-depth look at resolving these issues, check out our Garage Door Keypad Not Working Guide.
What to Do If the Garage Door is Closed and Inaccessible
What happens if you are locked out of your house, the garage door is shut, your keypad isn’t working, and you cannot get inside to press the “Learn” button on the motor unit?
- Use the Emergency Key Release: If your garage does not have a secondary entry door, you should have an emergency key release lock installed on the top section of your garage door. Inserting the key and turning it allows you to pull the lock tumbler out, which pulls a cable that releases the internal trolley. You can then manually lift the door.
- Check for Alternative Access: Enter your home through a front or back door, walk into the garage from the inside, and pull the red emergency release rope down and back toward the motor to disconnect the carriage. You can then lift the door manually to get your car out.
- Call the Professionals: If you are completely locked out with no secondary access and no emergency key release, do not try to force the door open, as you can damage the expensive spring system. Contact us at Matrix Garage Doors for prompt assistance.
Common Troubleshooting Steps
If your keypad fails to operate the door after installation, run through this quick diagnostic checklist:
- Check the Batteries: This is the culprit 90% of the time. Even if the keypad’s backlight turns on, the battery might not have enough power to transmit a strong radio signal to the motor. Swap in a fresh, high-quality alkaline battery.
- Verify Keypad Wiring (For Wired Models): If you installed a wired model, check the two-wire connections on the back of the keypad and on the motor terminal strip (usually terminals 1 and 2). Ensure the wires are securely connected and aren’t pinched or frayed. If you are using a universal adapter kit, refer to the Universal Garage Door Keyless Control Model KN-1 Instructions or the How To Install Sears Keypad – Garage Door guide to double-check your wiring schematic.
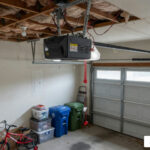
- Clear Signal Interference: Ensure the thin wire antenna hanging down from your garage door opener motor is hanging straight down and isn’t cut or wrapped around the chassis. This antenna is crucial for receiving the keypad’s signal.
- Perform a Hard Reset: If the keypad refuses to sync, clear the opener’s memory by holding down the Learn button for about 6 seconds until the indicator light goes out. Note: This will erase all programmed remotes, so you will need to reprogram your remotes and your keypad from scratch.
Best Practices for Long-Term Maintenance
To ensure your keypad remains reliable through freezing Ohio winters and humid summers, follow these simple maintenance habits:
- Keep it Clean: Wipe down the keypad buttons with a damp microfiber cloth every few months to remove dirt, pollen, and oils from your fingers that can cause keys to stick.
- Protect it from the Elements: If your keypad isn’t mounted under a protective porch roof or awning, ensure the protective flip cover is always closed when the keypad is not in use. This keeps rain, snow, and direct sunlight off the sensitive rubber keys.
- Annual Battery Swaps: Don’t wait for the battery to die completely. Replace your keypad’s battery once a year (autumn is a great time, so your battery is fresh before the cold winter weather hits).
Frequently Asked Questions About Garage Door Keypads
How do I change or reset the PIN code on my keypad?
The exact process depends on your brand, but for most standard rolling code systems (like LiftMaster or Chamberlain), you can change your PIN without knowing the old one:
- Press the Learn button on your garage door opener motor unit.
- Within 30 seconds, enter your new 4-digit PIN on the exterior keypad.
- Press and hold the Enter button until the opener lights blink. Your new PIN is now active!
Can I use one keypad to control multiple garage doors?
Yes, but you must buy a keypad specifically designed with multi-door capability. Many universal keypads and brand-specific keypads allow you to control up to 3 or 4 separate garage doors. You will program each door to a different PIN or use a master PIN followed by a door number (e.g., entering your PIN and then pressing “2” to open the second door). Some specialized smart keypads, like the myQ Video Keypad, are designed to control only a single residential garage door opener.
How long do garage door keypad batteries typically last?
Standard wireless keypad batteries (9V or AAA) typically last between 1 to 2 years, depending on how frequently the door is used and local weather conditions. Smart video keypads that stream live video and use rechargeable lithium-ion batteries will require recharging every 3 to 6 months depending on your motion detection settings and video clip length.
Conclusion
Installing a keypad for a garage door is an incredibly rewarding, low-cost DIY project that brings instant convenience to your daily routine. No more worrying about the kids losing their house keys, and no more carrying a bulky remote when you go out for a run or walk the dog.
While installing a wireless keypad is a simple task for most homeowners, sometimes garage door systems present unexpected challenges — whether it’s an outdated motor, complex wiring issues, or a broken spring that prevents the door from opening even after the keypad is programmed.
If you run into any trouble, or if you’d rather have an expert handle the installation and inspect your entire garage door system for safety, our team at Matrix Garage Doors is here to help. We are a family-owned company based right here in Columbus, OH, offering 24/7 residential garage door repair, maintenance, and installations.
Whether you are in Dublin, Hilliard, Westerville, Bexley, or any of our other surrounding Columbus communities, we provide prompt, professional service backed by two decades of local experience.
Ready to upgrade your home’s access? Contact us today to schedule your service or explore our professional options on the Matrix Garage Doors Services page!