The Best Universal Garage Door Opener Mounts for Your Home
Why Choosing the Right Garage Door Opener Mount Matters for Your Home
Choosing the right garage door opener mount is the first step toward a smooth, safe, and long-lasting installation. The wrong mount — or a poorly installed one — can lead to vibration, misalignment, or even a door that fails to reverse safely.
Quick Answer: Most Common Garage Door Opener Mount Types
| Mount Type | Best For | Key Benefit |
|---|---|---|
| Ceiling mount (rail system) | Most standard garages | Affordable, widely compatible |
| Wall mount (jackshaft) | Low-ceiling or high-lift garages | Frees up to 80% more ceiling space |
| Universal hanging kit | Ceiling mount without built-in brackets | Fits any brand, adjustable angle iron |
With roughly 70% of U.S. households owning a garage, and the vast majority of new homes coming with an opener already included, getting the mounting hardware right is something millions of homeowners deal with every year. Yet it’s one of the most overlooked parts of the installation process.
The mount is what keeps the entire opener system in place — and it has to handle thousands of open-and-close cycles over its lifetime.
I’m Andrew Hopson from Matrix Garage Doors, and over the years our team has installed and repaired hundreds of garage door opener systems across the Columbus, Ohio area — giving us deep hands-on experience with every type of garage door opener mount configuration you’ll encounter. In this roundup, I’ll walk you through the best universal mounting options so you can find the right fit for your garage.

Explore more about garage door opener mount:
Understanding the Garage Door Opener Mount and Its Types
When it comes to securing your automatic operator, you cannot simply bolt it anywhere and hope for the best. The type of garage door opener mount you choose dictates how your system is structured, how much noise it makes, and how much overhead storage space you retain.
Choosing the correct mounting style is essential during any new Garage Door Opener Installation. Let’s break down the primary configurations: ceiling mounts and wall mounts.
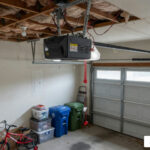
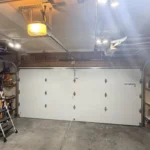
Ceiling-Mounted Garage Door Opener Mount Options
The traditional overhead ceiling mount is the most common setup in Ohio homes. This configuration features a central rail extending from the header wall above the door to a motor unit suspended from the ceiling joists.
Suspended systems rely heavily on perforated angle iron or a dedicated universal hanging kit. The perforated steel allows for custom vertical and horizontal adjustments to keep the rail completely level.
When installing a ceiling mount, securing the brackets to structural framing or ceiling joists is non-negotiable. Bolting hardware into thin drywall or plaster will eventually pull free, creating a major safety hazard. For a detailed look at structural ceiling mounting layouts and dimensions, you can review the Genie Hanging Kit Guide.
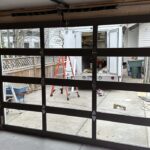
Wall-Mounted and Jackshaft Garage Door Opener Mount Systems
If you want to maximize your overhead storage or have a garage with a very low or exceptionally high ceiling, a wall-mounted (jackshaft) system is an excellent alternative.
Instead of suspending a heavy motor unit from the ceiling, a jackshaft opener mounts directly to the wall on either the left or right side of the garage door. It couples directly to the door’s torsion bar to turn the spring shaft, lifting the door without the need for a central rail.
This side-mount configuration is ideal for high-lift doors and offers incredible space savings, freeing up to 80% of your ceiling space. Because there is no long rail or chain traveling overhead, jackshaft systems are incredibly quiet and eliminate the typical vibrations associated with ceiling-mounted models.
Essential Tools and Preparation for Installing a Garage Door Opener Mount
Before diving into the installation, having the right tools prepared will save you multiple trips to the hardware store.

To ensure a safe and efficient installation, gather these tools first:
- Safety glasses and heavy-duty work gloves
- Power drill with a complete set of drill bits (for drilling pilot holes)
- Socket wrench set (or open-ended wrenches)
- Tape measure and a reliable bubble level
- Sturdy stepladder
- Hacksaw (if you need to cut custom lengths of perforated angle iron)
If you find that your existing hardware is worn out, or if you need specialty brackets, check out our guide on Garage Door Repair and Replacement Parts for Every Homeowner to identify exactly what you need.
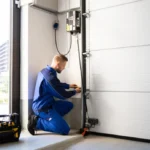
Pre-Installation Safety and Door Balance Testing
We cannot emphasize safety enough: a garage door is the largest and heaviest moving object in your home. The springs that balance this heavy door are under extreme tension. Before mounting any new hardware, you must perform a manual door balance test:
- Disconnect the Opener: Pull the emergency manual release handle (usually a red cord) to operate the door by hand.
- Lift the Door: Raise the door manually about halfway up and let go.
- Check the Balance: A properly balanced door should stay in place or hover slightly. If it crashes down or shoots upward, your springs are out of balance. Do not attempt to adjust the springs yourself—call a professional technician immediately.
- Disable All Locks: Ensure any manual slide locks or ropes are completely removed or disabled to prevent accidental damage to your new motor unit.
For comprehensive safety protocols and detailed electrical requirements, refer to the CRAFTSMAN Installation Guide.
Step-by-Step Guide to Installing a Universal Garage Door Opener Mount
To help you visualize the installation process, let’s compare the basic steps for both ceiling and wall-mounted installations:
| Installation Step | Ceiling-Mounted (Overhead Rail) | Wall-Mounted (Jackshaft) |
|---|---|---|
| 1. Header Attachment | Mounts to the header wall above the door | Not required (mounts to side wall) |
| 2. Assembly | Assemble the multi-piece rail and attach the trolley | Slide the opener directly onto the torsion bar |
| 3. Main Support | Suspend the motor unit from ceiling joists using angle iron | Anchor the mounting bracket to the side wall stud |
| 4. Connection | Connect the curved opener arm to the door bracket | Fasten the collar and torque bracket to the wall |
To keep your system running smoothly after installation, review our Garage Door Maintenance Tips to establish a routine checkup schedule.
Mounting the Header Bracket and Rail Assembly
The header bracket serves as the primary anchor point for a ceiling-mounted opener rail.
- Locate the Centerline: Measure the width of your garage door and mark the exact center on the header wall above the door. Extend this line up onto the header wall.
- Determine Height Clearance: Open your door to its highest point of travel (the high-arc point) and measure the distance to the ceiling. The header bracket must be mounted at least 2 inches above this high-arc point to prevent the rail from rubbing against the door panels.
- Secure to Structural Wood: Never mount the header bracket directly into drywall. If there isn’t a solid wood stud at your centerline, install a 2×4 wood anchor pad across the wall studs using heavy lag screws.
- Drill Pilot Holes: Drill pilot holes into the structural framing before driving in your lag screws to prevent the wood from splitting. Attach the header bracket securely.
- Connect the Rail: Align the opener rail with the header bracket and secure it using the provided clevis pin and cotter ring.
For step-by-step visual references regarding steel doors and specific reinforcement layouts, consult the Clopay Opener Attachment Instructions.
Securing the Hanging Bracket and Motor Unit
Once the rail is pinned to the header wall, lift the motor unit up onto a tall stepladder (use a cardboard box on top of the ladder to protect the opener chassis from scratches).
- Position the Motor: Align the motor unit so that the rail is perfectly level and centered with the door.
- Fabricate Hanging Straps: Measure the distance from the motor unit’s mounting tabs to the ceiling joists. Use a hacksaw to cut your perforated angle iron straps to size.
- Anchor to Joists: Locate the ceiling joists using a stud finder. Secure the top cross-brace of your hanging kit to the joists using 5/16″ x 1-1/2″ lag screws.
- Attach the Vertical Straps: Bolt the vertical angle iron pieces to both the ceiling bracket and the motor unit’s mounting tabs. Tighten all nuts, bolts, and lock washers securely.
- Vibration Isolation (Optional): For attached garages where quiet operation is key, consider adding rubber vibration isolators between the angle iron and the motor unit.
Frequently Asked Questions About Garage Door Opener Mounting
How do I reinforce a lightweight garage door for an opener bracket?
Modern steel, aluminum, and fiberglass residential doors are lightweight and can easily bend under the concentrated force of an automatic opener. To prevent damage and maintain your warranty protection, you must install an operator reinforcement bracket or horizontal reinforcement angles across the top section of the door.
This bracket distributes the pulling and pushing force of the opener arm across the entire top panel rather than a single point.
What is the standard height for mounting a garage door opener?
For safety reasons, a ceiling-mounted garage door opener should be installed so that the bottom of the motor unit and rail are at least seven feet high above the garage floor.
Additionally, the manual emergency release handle must be suspended exactly six feet above the floor to ensure it is within easy reach of an adult but out of reach of small children.
How do I test the safety reversal system after mounting?
Once your garage door opener mount is fully secured, you must test the safety systems:
- Photo-Eye Alignment: Ensure the safety sensors are mounted no higher than 6 inches above the garage floor and are facing each other. The indicator lights should be solid, not blinking.
- The Block Test: Place a 1-1/2-inch thick object (like a 2×4 block of wood laid flat) on the garage floor directly in the path of the door.
- Activate the Door: Close the door using your wall button. When the door contacts the wood block, it must immediately stop and reverse back to the fully open position. If it doesn’t, adjust the limit and force settings according to your owner’s manual.
Conclusion
Installing a garage door opener mount correctly ensures your home’s entry point remains secure, quiet, and safe for your family. Whether you opt for a heavy-duty ceiling-suspended angle iron kit or a space-saving side-mount jackshaft system, taking the time to measure precisely and anchor into solid structural wood makes all the difference.
If you are located in the Columbus, OH metro area—including Bexley, Dublin, Westerville, Upper Arlington, Powell, Hilliard, or Grove City—and would prefer to leave the heavy lifting to the experts, we are here to help. Matrix Garage Doors is a local, family-owned company with two decades of experience providing professional installation and 24/7 emergency repairs.
Let us handle your next project safely and efficiently. Contact us today to schedule your next Garage Door Services appointment!