Overhead Door Spring Installation: Master 7 Safe Steps
The Unsung Heroes of Your Garage Door

Overhead door spring installation is the process of replacing the high-tension steel coils that counterbalance your garage door’s weight. Here’s what you need to know at a glance:
Quick Overview:
- Two Main Types: Torsion springs (mounted above the door) and extension springs (along the side tracks)
- Average Lifespan: 10,000 to 15,000 cycles (7-20 years depending on usage)
- Safety Level: Extension springs are safer for DIY; torsion springs are extremely dangerous
- Professional Cost: Typically $200+ more than DIY, but eliminates serious injury risk
- Key Warning: Never use screwdrivers or pliers as winding bars—this is how injuries happen
Garage door springs are the muscles of your door. Without them, a 200-300 pound door would be nearly impossible to lift. These tightly wound coils store tremendous energy to counterbalance the door’s weight.
However, garage door springs are under extreme tension. A breaking spring can release energy violently, often with a loud bang. When replacing them, you’re handling a loaded spring that could cause severe injury or death if mishandled. This isn’t a typical DIY project; the line between saving money and an emergency room visit is razor-thin.
I’m Andrew Hopson of Matrix Garage Doors. I’ve helped hundreds of Columbus homeowners decide whether to tackle overhead door spring installation themselves or call a professional. This guide will help you make that choice safely.

Overhead door spring installation word roundup:
Understanding Your Garage Door’s Spring System
Before touching a spring, it’s crucial to understand what kind you have and the signals they send when failing. This section will help you identify your spring type, its components, and recognize when a replacement is needed.
Torsion vs. Extension Springs: What’s the Difference?
Most residential garage doors in Columbus, OH, use one of two spring systems: torsion or extension. They both counterbalance the door’s weight but work differently and have unique installation and maintenance needs.
Torsion Springs:
These heavy-duty springs are mounted on a metal shaft above the garage door. They twist to store energy as the door closes and unwind to help lift it. They are common on modern sectional doors.
- Pros: More durable, quieter, and offer controlled operation. They usually stay on the shaft when they break, making failure less catastrophic. Some are rated for up to 30,000 cycles.
- Cons: More expensive and extremely dangerous to replace due to high tension. Replacement requires specialized tools and expertise.
Extension Springs:
These longer, lighter springs are located on the sides of the horizontal tracks. They stretch to counterbalance the door’s weight using a system of cables and pulleys. They are often found on older or lighter doors, or where overhead space is limited.
- Pros: Less expensive and a more manageable (but still risky) DIY project.
- Cons: Noisier and wear out faster. A broken spring can fly dangerously across the garage if it doesn’t have a safety cable.
Here’s a quick overview:
| Feature | Torsion Springs | Extension Springs |
|---|---|---|
| Location | Mounted on a bar above the door | Run along the sides of the horizontal tracks |
| How they work | Twist to create torque | Stretch to lift |
| Durability | More durable, typically 15,000-30,000 cycles | Less durable, typically 10,000 cycles |
| Cost | Higher initial cost | Lower initial cost |
| Safety of DIY | Extremely dangerous, professional recommended | Manageable DIY with extreme caution, but still risky |
| Failure Mode | Usually stay on the shaft when broken | Can fly dangerously if no safety cable is present |
Key Components of the Spring Assembly
Understanding the parts of your spring system helps identify problems and appreciate the complexity of an overhead door spring installation.
- Winding Cones (Torsion Springs Only): Attached to the ends of the torsion spring, used to wind and unwind it.
- Stationary Cones (Torsion Springs Only): Secure the spring to the center bracket.
- Drums (Torsion Springs Only): Spools at each end of the torsion tube that wind the lift cables.
- Lift Cables: Steel cables connecting the bottom of the door to the spring system.
- Safety Cables (Extension Springs Only): Run through the center of each extension spring to contain it if it breaks.
- Center Bracket (Torsion Springs Only): Supports the torsion tube and anchors the springs.
- Torsion Tube (Torsion Springs Only): A metal shaft running horizontally above the door, holding the torsion springs.
- Pulleys (Extension Springs Only): Small wheels that guide the lift cables for extension spring systems.
7 Telltale Signs Your Garage Door Springs are Failing
Springs don’t last forever. Most are rated for about 10,000 cycles (one open/close). Depending on use, this is about 7-14 years. Here are seven signs your springs are failing:
- Loud Bang: A sound like a gunshot often means a spring has snapped.
- Visible Gap in Spring: Look for a 1-2 inch gap in your torsion spring’s coils. An extension spring may be visibly broken.
- Crooked or Uneven Door: A lopsided door often means one spring has broken, creating an imbalance.
- Door Slams Shut: If your door falls shut instead of lowering gently, the springs are no longer counterbalancing its weight.
- Door is Heavy to Lift Manually: After disengaging the opener, a properly balanced door should be easy to lift. If it’s extremely heavy, the springs have failed.
- Jerky Movements: A door that struggles or moves in fits and starts is a sign of failing springs.
- Strained Opener Motor: An opener motor that groans is likely compensating for worn-out springs, which can cause the opener to fail prematurely.
If you notice any of these signs, it’s time to address your garage door springs. For a professional assessment and swift resolution, don’t hesitate to reach out to us for Garage Door Repair services in Columbus, OH, and surrounding areas like Dublin, Hilliard, and Westerville.
A Step-by-Step Guide to Overhead Door Spring Installation
Replacing garage door springs is not a job for the faint of heart. The immense tension stored in these components makes them potentially very dangerous. While we provide these steps for informational purposes, we strongly recommend professional assistance for overhead door spring installation, especially for torsion springs. Before starting, ensure you have the correct replacement springs and have taken all safety precautions. This task carries significant risk.
How to Replace Extension Springs (The Safer DIY Option)
If you’re confident in your DIY skills and have extension springs, this can be a more approachable project than torsion spring replacement. However, safety must remain your absolute priority.
- Open Door Fully & Secure: Fully open your garage door and secure it in place with C-clamps on the vertical tracks, just above the bottom rollers. This prevents the door from accidentally closing.
- Unplug Opener: Disconnect your garage door opener from its power source. We don’t want any accidental activation during the process.
- Remove Old Spring (Farthest First): Start with the extension spring that’s farthest from the center of the door. Carefully unbolt the spring from the hanger or bracket it’s attached to.
- Disconnect Pulley and Cable: Once the spring is free, gently disconnect the pulley and lift cable from the spring and the track system.
- Install New Spring: Thread the new extension spring onto the safety cable (if you don’t have one, install one now – it’s a non-negotiable safety feature!). Attach the new spring to the hanger or bracket.
- Reconnect Pulley and Lift Cable: Reconnect the pulley and lift cable to the new spring and the track system. Ensure the cable is properly routed and taut.
- Repeat for Second Spring: Move to the other side and repeat steps 3-6 for the second extension spring.
- Test Balance: Carefully remove the clamps and reconnect the opener. Test the door’s balance by manually lifting it halfway. It should stay in place. If it doesn’t, tension adjustments may be needed, which can involve repositioning the S-hook on the spring.

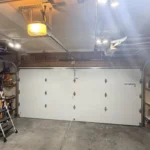
A properly installed extension spring with a safety cable running through it is crucial for safety.
How to Replace Torsion Springs (Advanced & High-Risk)
WARNING: Torsion spring replacement is extremely dangerous and best left to professionals. These springs are under immense tension and can cause severe injury or even death if mishandled. If you’re in Columbus, OH, or nearby areas like Pickerington or Grove City, we strongly urge you to contact us at Matrix Garage Doors for this service. However, for those determined to understand the process, here are the general steps:
- Close the Door & Unplug Opener: Ensure the garage door is fully closed. Unplug the garage door opener from its power source to prevent accidental operation.
- Clamp the Door: Secure the door in place using C-clamps on both vertical tracks, just above the bottom rollers. This prevents the door from rising unexpectedly.
- Unwind Old Springs: This is the most critical and dangerous step. Using two specialized winding bars, insert one into a winding cone hole. Hold it firmly, then loosen the set screws on the winding cone. Insert the second bar, and while holding the first, carefully remove the first bar and unwind the spring a quarter turn at a time. Alternate bars, leapfrogging them, until all tension is released.
- Loosen Set Screws & Remove Old Spring: Once unwound, loosen the set screws on the center bracket and the cable drums. Disconnect the lift cables from the drums. Carefully slide the old spring off the torsion tube.
- Install New Spring: Slide the new torsion spring(s) onto the torsion tube, ensuring they are oriented correctly (left-wound spring on the right side, right-wound spring on the left side) and the stationary cones are facing the center bracket.
- Wind the New Spring: Reconnect the lift cables to the drums and secure the drums. Now, using the winding bars, carefully wind the new springs, following the manufacturer’s recommended number of turns (typically 30-36 quarter turns for a 7-foot door).
- Tighten Set Screws: Once the springs are fully wound, firmly tighten the set screws on the winding cones and the center bracket.
- Lubricate: Apply a silicone-based garage door lubricant to the newly installed springs.
- Test: Carefully remove the clamps, reconnect the opener, and test the door’s balance and operation. Adjust tension as needed by adding or removing quarter turns.
For more in-depth, visual guidance on this complex process, you might consult resources like How to Repair Garage Door Springs and Cables.

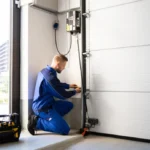
A technician using two winding bars on a torsion spring—a task requiring specialized tools and expertise.
Preparation and Measurement for Spring Replacement
Proper preparation and accurate measurements are non-negotiable for a safe and successful overhead door spring installation. Cutting corners can lead to incorrect parts, dangerous malfunctions, and another costly replacement.
Critical Safety Precautions
We cannot stress this enough: safety is paramount. These components store immense energy and can cause serious harm.
- Unplug the Garage Door Opener: Always disconnect the power to your opener and pull the emergency release cord.
- Secure the Door in Place: Close the door fully and secure it with C-clamps or locking pliers on the vertical tracks, just above the bottom rollers.
- Never Use Screwdrivers as Winding Bars: This is a fast track to the emergency room. Use only specialized winding bars designed to withstand the force.
- Wear Protective Gear: Always wear heavy-duty work gloves and safety glasses.
- Keep Hands and Face Clear: Never place your hands or face near springs under tension or where they could break.
- Understand the Stored Energy: Treat garage door springs with the respect they demand. They store hundreds of pounds of force.
Always wear protective gear and secure the door with C-clamps before beginning any spring work.
Tools and Parts You’ll Need
Having the right tools is crucial for safety and success.
- Winding Bars (for Torsion Springs): Two specialized steel winding bars are essential.
- Socket Wrench Set: For various nuts and bolts.
- Open-End Wrenches: For bolts in tight spaces.
- C-Clamps or Locking Pliers: To secure the garage door.
- Sturdy Ladder: For safe access.
- Tape Measure: For accurate spring measurements.
- Safety Glasses and Heavy-Duty Gloves: Essential protective gear.
- Replacement Springs: The correctly sized springs.
- Replacement Cables (Recommended): It’s a good idea to replace cables if they show any fraying or wear.
- Silicone-Based Lubricant: For post-installation maintenance.
How to Accurately Measure for Replacement Torsion Springs
Using the wrong size spring can damage your door and opener. Accurate measurement is critical for a safe replacement.
- Measure Inner Diameter: Measure the inside diameter of the spring coil. Common sizes are 1.75 and 2 inches.
- Determine Wire Size: Measure the length of 20 coils in inches, then divide that number by 20. For example, if 20 coils measure 5 inches, your wire size is 0.250 inches.
- Measure Spring Length: With the spring unwound, measure its entire length from end to end. If the spring is broken, piece it together to get an accurate total length.
- Determine Wind Direction: Look at the end of the spring to see which way the coils twist. A right-hand wind spring (typically on the left side) is replaced with the same, and a left-hand wind spring (typically on the right) is replaced with the same.
Taking these measurements precisely will allow you to order the correct replacement springs. For more comprehensive information or if you’re considering a complete upgrade, check out our guide on More info about new garage door installation.
DIY vs. Professional: Making the Right Choice
When it comes to overhead door spring installation, the decision between DIY and calling a professional is critical. While saving money is appealing, the risks involved with high-tension springs warrant careful consideration.
The Risks and Rewards of a DIY Overhead Door Spring Installation
A DIY overhead door spring installation could save you $200 or more on labor, but that savings comes with a high price if things go wrong.
Rewards:
- Cost Savings: You save on professional labor fees.
- Sense of Accomplishment: The pride of fixing it yourself.
Risks:
- High Risk of Severe Injury: This is the biggest concern. Springs store immense energy. A snapping spring or slipping winding bar can cause broken bones, severe lacerations, or even death.
- Potential for Property Damage: An uncontrolled spring or falling door can damage your car or other property.
- Incorrect Installation: Improperly sized or installed springs lead to an unbalanced door, premature wear on your opener, and a shortened lifespan for the new springs.
- Voiding Warranty: A DIY repair might void the warranty on your garage door or opener.
Why Hiring a Professional is the Smartest Choice
For us at Matrix Garage Doors, the choice is clear, especially for torsion springs: hiring a professional is the safest and smartest decision. Our team serves homeowners throughout Columbus, OH, and surrounding communities like Grandview Heights, Hilliard, and New Albany.
- Technician Safety: Our professionals are trained and equipped to handle high-tension springs safely.
- Correct Tools and Parts: We use only high-quality, correctly sized springs and components for longevity and proper function.
- Experience and Efficiency: We can diagnose and complete the installation correctly and efficiently, often in under an hour.
- System-Wide Inspection: We inspect your entire garage door system—cables, rollers, tracks, and opener—to identify other potential issues, saving you future headaches.
- Guaranteed Work: Our work is backed by a satisfaction guarantee.
- Peace of Mind: You can rest easy knowing your garage door is operating safely and smoothly.
When your garage door springs are giving you trouble, don’t take unnecessary risks. Contact us for expert Garage Door Repair in Columbus, OH.
Post-Installation Care and Longevity
Your new springs are installed, but the job isn’t quite finished. Proper maintenance will ensure they last for years, keeping your garage door operating safely and smoothly.
Essential Maintenance After Your Overhead Door Spring Installation
A few simple maintenance steps can significantly extend your springs’ lifespan.
- Lubrication: At least twice a year, lubricate your springs, rollers, and hinges with a silicone-based garage door lubricant. Avoid using water-based lubricants like standard WD-40, as they can attract dirt. Lubrication reduces friction and wear.
- Balance Test: Disconnect your garage door opener and manually lift the door halfway. A properly balanced door should stay put. If it sags or shoots up, your springs may need adjustment.
- Visual Inspection for Rust or Wear: Periodically inspect your springs for rust or wear. Cold Columbus, OH, winters can make springs more brittle, so catching issues early is key.
- Checking Cable Tension: Ensure the lift cables are taut and not frayed. Loose cables can indicate an issue with spring tension.
Regular maintenance helps prevent unexpected breakdowns. For comprehensive care, explore our Garage Services and Repairs.
How Long Do Garage Door Springs Last?
Spring lifespan is measured in “cycles,” with one cycle being one complete opening and closing.
- Standard Lifespan: Most springs are designed for around 10,000 cycles.
- High-Cycle Springs: More durable torsion springs are available, rated for 15,000 to 30,000 cycles, a worthwhile investment for high-traffic garages.
Impact of Usage and Climate:
The more you use your door, the faster springs wear out. A door used twice daily with 10,000-cycle springs will last about 13 years; four times a day cuts that to about 6.5 years. Cold Ohio winters can also make the steel more brittle and prone to breaking.
Extending Lifespan:
Regular lubrication and proper balance help springs reach their maximum lifespan. If one spring in a dual system breaks, we recommend replacing both, as the other has endured the same wear and is likely to fail soon, saving you a future service call.
Conclusion: Keep Your Garage Door Operating Safely and Smoothly
The springs are the true workhorses of your garage door system, lifting hundreds of pounds daily. Understanding their types, how they function, and the signs of impending failure is crucial for any homeowner. While the idea of a DIY overhead door spring installation might seem appealing for extension springs, the inherent dangers of high-tension components, especially torsion springs, cannot be overstated.
Safety is paramount, and the risk of severe injury or property damage far outweighs the potential cost savings of a DIY attempt when it comes to torsion springs. Even with extension springs, caution and proper safety measures are essential.
For guaranteed safety, precision, and expert service in Columbus, OH, and surrounding areas like Dublin, Hilliard, Westerville, and New Albany, trust the experienced team at Matrix Garage Doors. We’re here to ensure your garage door operates safely and smoothly for years to come.
Contact us for professional garage door repair services – we’re ready to help, 24/7.