The Easy Way to Automate Your Roll Up Garage Door
Why Roll Up Door Motor Installation Is Worth Doing Right
Roll up door motor installation involves mounting a jackshaft or tube-style motor operator onto your door’s axle, wiring it to a power supply and safety sensors, setting travel limits, and testing the system before use. Here’s a quick overview of the process:
- Check compatibility – Confirm your door is balanced, the shaft rotates freely, and you have enough side room and headroom.
- Gather tools and safety gear – You’ll need a drill, pipe wrenches, socket set, level, and PPE.
- Mount the motor – Slide the operator onto the door axle and secure it to the wall bracket.
- Wire the system – Connect power, safety beams, and control accessories.
- Set travel limits – Program the open and close positions using the operator’s control buttons.
- Test safety features – Verify the door reverses on contact with an obstruction.
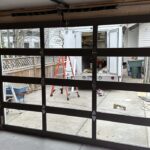
A roll-up door is not the same as a standard sectional garage door, and that matters more than most people realize. The motor mounts differently, the compatibility requirements are stricter, and the risks of getting it wrong – think a door that jams, drops, or fails its safety check – are very real.
Whether you have a single-car storage-style door or a light commercial rolling door, automating it the right way means understanding the specific type of operator your door needs, the clearances required, and the safety steps that protect both the door and the people using it.
I’m Andrew Hopson, and through my work at Matrix Garage Doors serving homeowners across Columbus, OH, I’ve handled everything from straightforward roll up door motor installation projects to complex retrofits on older manual doors. This guide walks you through exactly what to expect.

Understanding Motor Types and Door Compatibility
When we talk about automating a roll-up door, we aren’t talking about the big rail-and-trolley systems you see in most suburban garages. Roll-up doors—the kind that coil up into a tight bundle above the header—require specialized operators.

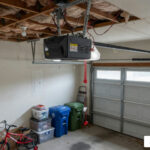
The most common choice is a jackshaft operator. These motors mount directly to the wall and slide over the door’s axle (the torsion pole). Brands like the LiftMaster LJ8950W are designed specifically as light-duty commercial operators for these rolling doors, offering features like built-in Wi-Fi and MyQ remote access.
Another option is the tube motor, which is often found in tight-clearance situations. These motors are actually concealed inside the shaft assembly (the barrel). While they save space, they can be more complex to service later on.
Differences Between Roll-Up and Sectional Openers
It is a common mistake to think you can just swap a sectional opener for a roll-up one. They operate on entirely different mechanical principles.
| Feature | Roll-Up Motor (Jackshaft) | Sectional Opener (Trolley) |
|---|---|---|
| Mounting Location | Directly on the axle/side wall | Center of the ceiling |
| Drive Mechanism | Rotates the shaft directly | Pulls a trolley along a rail |
| Space Required | High side-room, low ceiling depth | High ceiling depth, low side-room |
| Safety Features | Electronic profiling/sensing edges | Photo eyes and rail-based limits |
Because roll-up motors are rail-free, they are excellent for garages with high ceilings or where you need to maximize overhead storage. However, they demand significant side-room—usually between 3.5 to 5.5 inches—to accommodate the motor body on the end of the axle. If you’re unsure which fits your space, checking out more info about garage door services can help clarify your options.
Determining If Your Door Is Ready for Automation
Before you buy a motor, we need to make sure your door is actually “automatable.” A motor is a helper, not a miracle worker. If your door is physically difficult to move, a motor will likely burn out or trigger a safety reversal immediately.
- Door Balance: Disengage any locks and lift the door halfway by hand. It should stay in place. If it crashes down or flies up, the spring tension is wrong.
- Shaft Rotation: Ensure the shaft actually spins. Some older manual doors have fixed shafts where the curtain simply slides around the drum. For a jackshaft motor to work, the shaft must rotate with the door.
- Drum Revolutions: High-performance operators, like the ET NICE DCBARU, are often rated for a specific number of drum revolutions (e.g., up to 137) and a maximum door size (often around 8m² or 86 sq. ft.).
- Curtain Condition: Look for “coning” or “telescoping,” where the door doesn’t roll up straight. This friction can overload the motor.
For those looking for residential-specific hardware, the Dominator EasyRoller is a popular choice known for its 5-year/10,000-cycle warranty and slim profile.
Essential Tools and Safety Precautions for Roll Up Door Motor Installation
Safety isn’t just a “nice to have” in our industry; it’s a requirement. Roll-up doors utilize high-tension torsion springs that store enough energy to cause serious injury if mishandled.
Critical Safety Protocols
Before we even touch a wrench, we follow these non-negotiables:
- Spring Tension: Never attempt to adjust the tensioner unless you are using proper steel winding bars. Never use screwdrivers or pliers for this task.
- Manual Release: By law, every opener must have a manual release mechanism. This is usually a red cord that allows you to operate the door by hand during a power failure.
- Electrical Safety: Ensure the motor is properly grounded. Most residential units plug into a standard outlet, but commercial-grade motors may require dedicated 220Vac circuits.
- Entrapment Protection: Modern motors use electronic profiling to “learn” the door’s load. If the door hits something, the motor detects the change in current and reverses.
Required Tools and Materials
To complete a roll up door motor installation, you’ll want to have these ready:
- Drill and Masonry/Metal Bits: For mounting brackets to the jambs.
- Socket Set and Wrench: For tightening U-bolts (typically to about 30 ft-lbs).
- Pipe Wrenches: Two are needed to hold the axle while adjusting tension.
- Level: To ensure the motor and axle are perfectly horizontal.
- Silicone Spray: To lubricate the guides (never use grease or WD-40 on Nylofelt strips).
If you are starting from scratch with a new door, there are specific things to look for, such as installing a steel garage door: what you need to know, to ensure the structure can support a motor.
Step-by-Step Guide to Automating Your Door
Ready to get to work? Follow this sequence to ensure a smooth installation.
Preparing the Door for Roll Up Door Motor Installation
First, we have to prep the “canvas.”
- Clean the Guides: Use white spirit or a similar cleaner to remove any grit from the tracks.
- Remove Manual Locks: This is vital. If the motor tries to open a locked door, it will damage the curtain or the motor gears.
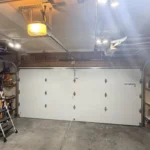
- Fit the Weight Bar: Most motor kits include a weight bar that bolts to the bottom rail. This provides enough gravity to prevent the curtain from “ballooning” or uncoiling loosely when the motor starts to push it down.
- Pin the Curtain: This is a step many DIYers skip. You must use screws (often M10 x 32mm) to “pin” the door curtain to the drum wheels. This prevents the door from being manually forced up from the outside and ensures the motor has a direct mechanical link for safety sensing.
For more details on the door itself, see our garage door installation guide.
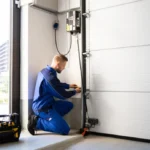
Mounting and Programming the Roll Up Door Motor Installation
Now we mount the muscle.
- Slide the Opener On: With the door supported, slide the motorhead over the axle. Ensure the drive forks of the motor engage with the spokes of the drum wheel.
- Secure the U-Bolts: Fasten the motor to the axle using the provided U-bolt clamps. Tighten them firmly so there is no slippage.
- Set the Limits: This is where the “smart” part comes in. Most modern operators have “Open” and “Close” buttons. You’ll move the door to the fully open position and save it, then repeat for the closed position.
- Electronic Profiling: Once limits are set, the motor will run a full cycle to learn the “force profile.” It records how much power is needed at every inch of travel. If it later encounters more resistance (like a person or a car), it will stop.
Integrating Safety Features and Smart Accessories
Once the motor is moving the door, we need to make sure it stops when it’s supposed to.
Setting Up Entrapment Protection
Safety sensors (photo eyes) are the gold standard. We install these no higher than 6 inches from the floor.
- Alignment: One sensor sends an amber light, and the other receives it, showing a green light. If that beam is broken, the door won’t close.
- Sensing Edges: On commercial doors, we often add a rubber “sensing edge” to the bottom bar. If it touches an object, it sends an immediate signal to the motor to reverse.
When we are installing a new garage door with Matrix Garage Doors, we always prioritize these sensors to meet UL 325 safety standards.
Remote Access and Control Systems
The days of just having a clicker on your visor are over.
- Wi-Fi Connectivity: Systems like MyQ allow you to check if you left the door open from your phone while you’re at work in Dublin or Westerville.
- Rolling Codes: Modern remotes use billions of code combinations to prevent “code grabbing” by tech-savvy thieves.
- Battery Backup: A small 1.3Ah or 1.5Ah battery can provide up to 25 operations during a power failure, which is a lifesaver during Ohio’s summer storm season.
Troubleshooting and Long-Term Maintenance
A roll-up motor is a workhorse, but even the best horses need a check-up.
Common Installation Mistakes to Avoid
In our years serving the Columbus area, we’ve seen these “oops” moments more than a few times:
- Unpinned Curtains: If you don’t pin the curtain to the drum, the door can be slid up by a burglar, even if the motor is “locked.”
- Misaligned Sensors: If your door starts to close and then pops back up for no reason, check the sensors. Dirt, spiderwebs, or sunlight glare can trip them.
- Insufficient Side-Room: Trying to “force” a motor into a space that’s too tight leads to vibration and premature gear failure.
- Improper Tensioning: If the motor sounds like it’s screaming, the door is likely too heavy because the springs aren’t doing their job.
Routine Maintenance Schedule
- Monthly: Perform a reversal test. Place a 1.5-inch object (like a 2×4) on the floor. The door must reverse within two seconds of touching it.
- Every 6 Months: Clean the guides with a cloth and silicone spray. Check that all bolts and U-clamps are tight.
- Annually: Schedule a professional service. We check the spring balance and motor force settings to ensure everything is within factory specs. This is especially important for new garage door installation in Columbus, OH to keep your warranty valid.
Frequently Asked Questions about Roll Up Door Motors
Can I install a roll-up motor on a door that is hard to open manually?
No. A motor is designed to move a well-balanced door. If the door is heavy or sticking, the motor will likely trigger its safety reverse or burn out. You must fix the balance or clean the tracks before proceeding with roll up door motor installation.
What is the difference between residential and commercial motor installation?
Residential motors (like the Dominator) are built for lower duty cycles—maybe 10 to 20 openings a day. Commercial operators (like the LiftMaster LJ8950W) are designed for higher “duty cycles” and can handle the weight of larger, insulated steel curtains used in warehouses or storefronts.
How do I operate the door during a power failure?
Locate the red manual release cord. Pull it down until you hear a click. This disengages the motor from the axle, allowing you to lift the door by hand. To re-engage, pull the cord toward the door and run the motor until it “clicks” back into place.
Conclusion
Automating your roll-up door is one of the best upgrades you can make for your home or business. It adds a layer of security, saves your back from heavy lifting, and—let’s be honest—it’s just plain convenient when you’re pulling into your driveway in Hilliard or Upper Arlington on a rainy night.
At Matrix Garage Doors, we’ve spent two decades perfecting the art of garage door automation. From Bexley to Grove City, we take pride in providing prompt, professional service that Columbus families can rely on. Whether you need a brand-new roll up door motor installation or just a tune-up for an existing system, we’re here 24/7 to help.
Ready to make your garage door “smart”? Schedule your garage door opener installation with us today and experience the Matrix Garage Doors difference!