How to Replace a Garage Door Seal and Keep the Drafts Out
What You Need to Know Before You Replace a Garage Door Seal
Replacing a garage door seal is a straightforward DIY job that most homeowners can complete in under an hour with basic tools.
Here’s a quick overview of how to do it:
- Measure your garage door width and identify your seal type (T-end, U-shape, bulb, or nail-on)
- Raise the door and disengage the opener
- Slide or pull out the old seal from the retainer track
- Clean the track with soapy water
- Lubricate the track with silicone spray or dish soap
- Slide in the new seal, using a helper for doors wider than 9 ft
- Trim the excess with a utility knife for a flush fit
- Test the door by closing it fully and checking for gaps
A worn seal lets in cold air, moisture, insects, and debris. In Columbus, Ohio, where winters can be harsh, a failing seal can quietly drive up your heating bills and invite pests indoors — often without you noticing until the damage is done.
I’m Andrew Hopson from Matrix Garage Doors, and our team has helped countless Columbus homeowners replace garage door seals as part of our full-service garage door maintenance and repair work. In this guide, I’ll walk you through everything you need to get the job done right the first time.

Choosing the Right Materials to replace a garage door seal
Before you run to the store, you need to know exactly what you are looking for. Not all garage doors use the same “weatherstripping” or “astragal” (the fancy industry term for that bottom rubber). If you choose the wrong material, it won’t fit the track, or worse, it will fail after just one Ohio winter.
Material Comparison: Rubber vs. Vinyl vs. Silicone
The material you choose determines how long the seal lasts and how well it handles the temperature swings we see in places like Dublin or Westerville.
| Material | Best For | Pros | Cons |
|---|---|---|---|
| EPDM Rubber | General use | Flexible, durable, handles heat/cold well | Can be heavy to slide into long tracks |
| Vinyl | Budget-friendly | Easy to find, very affordable | Can stiffen and crack in extreme cold |
| Silicone | Extreme climates | Stays flexible at -40°F, longest lifespan | Generally more expensive |
Identifying Your Seal Type
You’ll find several seal types on the market, and each is designed for a specific retainer (the metal track at the bottom of the door).
- T-End Seals: These have a “T” shape on both ends that slides into two parallel grooves in the retainer. This is the most common style for modern steel doors.
- U-Shape Seals: Often used interchangeably with T-ends, these create a “U” when installed, providing a soft cushion against the floor.
- Bead-Style: These have a round “bead” that slides into a single circular track.
- P-Bulb: Common on older Wayne Dalton doors, these look like the letter “P” in profile.
- Nail-on Seals: Usually found on older wood doors in historic areas like Bexley or Grandview Heights. These don’t use a track; they are nailed directly into the wood.
If you are dealing with a pest problem, look for “Rodent-Resistant” seals. These contain specialized fabric or stainless steel mesh that stops mice from chewing their way into your warm garage. For more advice on keeping your door in top shape, check out our garage door maintenance tips.
Recommended Brands and Sizing
To replace a garage door seal successfully, you need the right dimensions. Standard garage door widths in the Columbus area are:
- 9ft: Standard single-car garage.
- 16ft: Standard double-car garage.
- 18ft: Oversized double-car garage.
Always buy a seal that is at least one foot longer than your door’s width. This allows for trimming and accounts for the fact that rubber can shrink slightly over time. Popular brands like DGSL, ProSeal, and Tsunami Seal are widely available at Home Depot or Amazon. Prices typically range from $10 for basic vinyl to $600 for heavy-duty commercial-grade kits. Accurate measurements are the only way to ensure a tight fit.
Step-by-Step Guide for Homeowners

Essential Tools to replace garage door seals
You don’t need a professional tool belt to replace a garage door seal, but having these items ready will save you from making three trips to the hardware store:
- Utility knife: For trimming the rubber.
- Flathead screwdriver & Pliers: To pry open crimped track ends.
- Measuring tape: To confirm door width.
- Soapy water or Windex: For cleaning the track.
- Silicone lubricant or Dawn dish soap: To help the rubber slide. (Avoid oil-based lubes like WD-40, as they can degrade the rubber!).
- Safety gear: Work gloves and safety glasses.
- For wood doors: A hammer and galvanized roofing nails.
Following these How to Replace Garage Door Seals instructions will ensure a professional-looking result.
Step-by-Step: How to replace a garage door seal
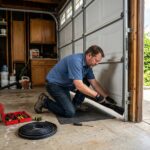
Now, let’s get to work. If you have a 16ft door, we highly recommend grabbling a neighbor or family member to help pull the seal while you feed it into the track.
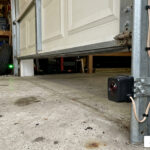
- Prep the Door: Close the garage door first to see where the gaps are. Then, open it to a comfortable working height (usually eye level) and disengage the automatic opener by pulling the red emergency cord. Use locking pliers or C-clamps on the tracks to keep the door from moving.
- Remove the Old Seal: Look at the ends of the metal retainer. Often, the factory “crimps” the ends to keep the seal from sliding. Use your screwdriver and pliers to gently bend these ends back. Now, slide the old seal out. If it’s stuck or “dry-rotted,” you may need to cut it into sections with your utility knife to pull it out.
- Clean the Track: This is a step most people skip, but it’s vital. Dirt, spider webs, and “rubber boogers” (old seal bits) will make installing the new seal a nightmare. Spray the track with soapy water and run a rag through it.
- Lubricate: Apply a generous amount of silicone spray or dish soap into the grooves of the track. This acts as a “slide” for the new rubber.
- The Feeding Technique: Fold the new seal into a “U” shape so the T-ends are aligned with the grooves. Start at one end and feed the T-ends into the track.
- The Helper Method: If you have a helper, have them stand at the far end of the door and gently pull the seal through the track while you stand at the starting end, guiding the rubber into the grooves. This prevents the rubber from stretching or tearing.
- Trimming for a Flush Fit: Once the seal is all the way across, don’t cut it exactly flush. Leave about 2 inches of excess on each side. Fold that extra material back into the hollow center of the seal. This prevents future shrinkage and provides a tighter seal against the side jambs.
- Final Check: Re-crimp the ends of the track with your pliers to lock the seal in place. Re-engage your opener and run a full cycle to ensure the door closes completely without the “auto-reverse” kicking in.
For more deep-dives into keeping your garage safe, see the ultimate guide to preventative garage door care.
Handling Installation Challenges and Different Seal Types
Sometimes, a simple “slide-in” job turns into a puzzle. Here is how we handle the curveballs:
Stiff Rubber and Tight Tracks
If you’re working on a cold day in Hilliard or New Albany, the rubber might be stiff. Lay the seal out in the sun for 30 minutes to soften it up, or dip the ends in warm soapy water. If the metal retainer is bent, use your flathead screwdriver to gently pry the channel back to its original width.
Wood Garage Doors
If you live in a historic home in Upper Arlington or Worthington, you might have a wood door. These usually require nail-on seals.
- Pull off the old seal and check the bottom of the door for wood rot.
- If the wood is sound, start at one end and use galvanized roofing nails spaced about 6 to 8 inches apart.
- Maintain slight tension as you go to ensure the seal lays flat against the wood.
Uneven Floors and Threshold Seals
Does your garage floor have a dip in the middle? A standard bottom seal might not be enough. In these cases, we often recommend a threshold seal. This is a solid rubber “dam” that you glue directly to the concrete floor using industrial adhesive. When the door closes, the bottom seal rests against this threshold, creating a double barrier against driving rain.
If you’re struggling with a gap that just won’t close, you might need a professional look at your door’s alignment. You can explore our full range of garage door services to see how we can help.
Maintenance Tips for Extended Seal Life
A high-quality seal can last up to 20 years, but only if you treat it right. Here is our “Matrix Pro” maintenance checklist:
- Seasonal Inspection: Twice a year (Spring and Fall), wipe down the seal with a damp cloth to remove grit and salt.
- The Light Test: Turn off the garage lights during the day. If you see daylight peeking under the door, your seal is failing or the door needs adjustment.
- Lubrication: Once a year, spray the seal with a silicone-based protectant. This keeps the rubber from becoming brittle and prevents it from freezing to the floor in the winter.
- Check the Opener: If you install a thicker seal, your opener might think it hit an object and reverse. You may need to adjust the “limit” or “force” settings on your motor.
Learn more about our professional garage door lubrication service to keep your entire system running quietly.
Frequently Asked Questions
When should I call a professional instead of doing a DIY replacement? While you can replace a garage door seal yourself, call us if you notice the metal retainer track is severely rusted or falling off. Also, if your door feels heavy or the cables look frayed while you’re working near the bottom, stop immediately. Those bottom brackets are under extreme tension from the springs, and a DIY mistake there can be dangerous.
How often should garage door seals be replaced? Generally, they last between 3 to 10 years. However, if you live in an area with high UV exposure or extreme temperature swings, they may need replacement sooner. If the rubber feels “crunchy,” looks flattened, or has visible cracks, it’s time for a new one.
Will a new seal work on an uneven garage floor? Yes! For uneven floors, we recommend a “Bulb-style” seal. Because they are hollow and very flexible, they compress more in high spots and stay expanded in low spots, filling the gap much better than a flat seal.
Conclusion
At Matrix Garage Doors, we know that a small rubber strip can make a massive difference in your home’s comfort. Whether you are in Canal Winchester, Grove City, or Pickerington, keeping the drafts out starts with a solid seal.
We are a family-owned company based right here in Columbus, OH, with two decades of experience. We offer 24/7 emergency residential garage door repair, so if you run into a problem you can’t handle—or if you simply want the peace of mind that comes with a professional installation—we are here for you. We guarantee customer satisfaction on every job, from simple seal swaps to full door installations.
Ready to secure your garage against the elements? Request a professional garage door seal replacement from our expert team today!