How to Fix a Sectional Garage Door That Has Gone Rogue
When Your Garage Door Goes Off the Rails (Literally)
Garage door track adjustment is the process of repositioning and realigning the metal tracks that guide your garage door’s rollers — fixing issues like binding, rubbing, grinding noises, or uneven movement. Here’s how it works at a glance:
- Disconnect the garage door opener and secure the door in place.
- Inspect both vertical and horizontal tracks for gaps, bends, or loose brackets.
- Loosen the mounting bracket bolts (don’t remove them fully).
- Reposition the track using a rubber mallet and a level.
- Tighten the bolts and test the door by opening and closing it several times.
Your garage door opens and closes roughly 1,500 times a year. Over time, that constant motion loosens hardware, wears down rollers, and slowly nudges tracks out of alignment. Sometimes all it takes is one bad bump from a car backing in a little too wide.
The result? A door that grinds, sticks, shudders, or refuses to close all the way. Left unchecked, misaligned tracks put extra strain on your opener, your springs, and the door panels themselves — turning a simple fix into a costly repair.
The good news: most track alignment issues are fixable with basic tools and a little patience. You don’t always need to call a pro.
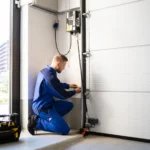
I’m Andrew Hopson from Matrix Garage Doors, and after years of diagnosing and repairing garage door systems across Columbus, Ohio — including countless track adjustment and realignment jobs — I’ve put together this guide to walk you through the entire process. Whether you’re dealing with a door that squeals, sticks, or just doesn’t sit right, garage door track adjustment is often the fix you need.

Identifying Misalignment and Safety Precautions
Before you grab your wrench, we need to talk about what “misalignment” actually looks like. A garage door track isn’t just a piece of metal; it’s a precision guide. If it’s off by even half an inch, the door will let you know.
Common Signs of Trouble
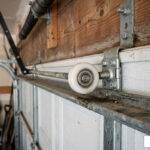
- Grinding or Scraping Noises: If you hear metal-on-metal screeching, the rollers are likely rubbing against the track edge rather than rolling smoothly inside the channel.
- Jerky Movement: Does the door “jump” or stutter as it moves? This often happens at the joints where the vertical track meets the curved transition piece.
- Visible Gaps: When the door is closed, look at the sides. You should see a uniform 1/4 inch gap between the door and the stop molding (the weatherstripping on the outside frame). If you see daylight in one spot and the door is crushed against the molding in another, you need an adjustment.
- Binding: This is when the door becomes physically difficult to move. It feels like it’s “sticking” in the tracks.

Binding vs. Rubbing: What’s the Difference?
| Symptom | Cause | Result |
|---|---|---|
| Binding | Track is too close to the door. | Door is hard to move; opener strains or reverses. |
| Rubbing | Track is too far from the door. | Gaps allow drafts/pests; door rattles or vibrates. |
Safety First: Don’t Skip These Steps
We can’t stress this enough: a garage door can weigh between 100 and 200+ pounds. If it falls while you’re working, it won’t just ruin your day—it can cause serious injury.
- Disconnect the Power: Unplug the opener. If it’s hardwired, turn off the breaker. You don’t want someone hitting the remote while your fingers are near the tracks.
- Disengage the Opener: Pull the emergency release cord (usually a red handle) to move the door manually.
- Secure the Door: If you are working on the vertical tracks, keep the door closed. If you must work with the door open, use vice grips or heavy-duty C-clamps clamped onto the track directly under the bottom roller to prevent the door from sliding down. A 2×4 piece of wood can also be used as a sturdy prop.
- Avoid the Springs: Never, ever touch the torsion spring (the big coil above the door) or the extension springs (on the sides). These are under immense tension and require professional garage door repairs if they are the source of the problem.
Step-by-Step Guide to Garage Door Track Adjustment
Now that the area is safe, let’s get to work. To perform a proper garage door track adjustment, you’ll need a few basic tools:
- Adjustable wrench or socket set (usually 7/16″)
- Screwdriver
- Rubber mallet
- Spirit level (a 2-foot or 4-foot level is best)
- Tape measure
The goal of this process is to ensure the tracks are “plumb” (perfectly vertical) and “level” (perfectly horizontal), with the correct spacing relative to the door. For a deeper dive into the mechanics, you can check out this step-by-step repair guide.
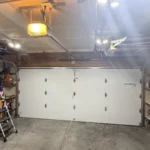
Vertical Garage Door Track Adjustment
The vertical tracks run from the floor to the top of the door opening. These are usually responsible for “binding” or “rubbing” issues against the door frame.
- Work with the Door Closed: This allows you to see the gap between the door and the stop molding.
- Loosen the Brackets: Find the mounting brackets that secure the track to the wall. Use your wrench to loosen the bolts just enough so the track can slide. Do not remove the bolts.
- Adjust the Gap: Use your rubber mallet to gently tap the bottom of the track. You want a consistent 1/4 inch spacing between the door and the stop molding.
- Check for Plumb: Place your spirit level against the side of the track. It must be perfectly vertical. If the track is slanted, the rollers will bind as the door rises.
- Tighten and Secure: Once aligned, tighten the bolts. Be careful not to overtighten—most track bolts only require about six foot-pounds of torque. You can refer to this fastener guide for more on bolt safety.
- Repeat: Do the same for the other side.
For more routine care, see our garage door maintenance tips.
Horizontal Garage Door Track Adjustment
The horizontal (overhead) tracks are what the door rests on when it is fully open. These need to be parallel to each other and perpendicular to the wall.
- Move the Door to the Open Position: Secure it with vice grips so it can’t move.
- Measure the Distance: The distance between the door and the overhead track should be approximately 1/2 inch.
- Check for Parallel Alignment: Measure the distance between the two horizontal tracks at the front (near the door) and the back (near the motor). They should be exactly the same distance apart.
- Adjust the Hangers: If the tracks are “toed-in” or “flared-out,” loosen the bolts on the track hangers (the metal straps hanging from the ceiling) and shift the track.
- The Downward Pitch: Most manufacturers recommend a slight downward pitch toward the back of the garage (about 1/4 inch per 10 feet). This helps keep the door from crashing down too quickly if the opener fails.
- Bending vs. Loosening: If a track is physically bent or dented, you might be tempted to use a hammer to straighten it. Be careful—hammering can weaken the metal. It is always better to loosen and realign. If the metal is creased or cracked, it’s time for a replacement.
When to Call a Professional
While a basic garage door track adjustment is a great DIY project, some situations are simply too dangerous or complex for a ladder and a wrench.
Signs You Need an Expert:
- Broken Torsion Springs: If you see a gap in the coil above your door, do not touch it. Springs are rated for about 10,000 cycles, and when they snap, they can be lethal.
- Frayed or Jumped Cables: If the steel cables on the sides are peeling or have come off the drums, the door is no longer supported.
- Structural Damage: If a car hit the track and the metal is twisted or the mounting brackets have ripped out of the drywall, the tracks likely need full replacement.
- Persistent Issues: If you’ve aligned the tracks but the door still shakes or reverses, there may be an issue with the opener’s logic board or the door’s balance.
Professional technicians typically charge between $75 and $100 per hour for labor. While DIY adjustment can save you roughly $300, the safety of your family is worth the investment if the job is over your head. Check out our full range of garage door services for more information.
Frequently Asked Questions about Track Alignment
Is it safe to adjust garage door tracks myself?
Yes, it is generally safe for a DIYer to adjust the tracks, provided you stay away from the high-tension springs and cables. The main risks are the weight of the door and the height of the ladder. Always work with a partner if possible and ensure the door is blocked so it cannot fall.
Should the garage door be open or closed during adjustment?
- Vertical Tracks: Adjust these with the door closed. This allows you to use the door itself as a reference point for the 1/4 inch gap against the molding.
- Horizontal Tracks: Adjust these with the door open. This allows you to ensure the tracks are supporting the weight of the door evenly and are parallel to one another.
How often should I perform garage door maintenance?
We recommend a full inspection and lubrication every four to six months. Regular cleaning of the tracks (using a cloth and compressed air—never grease!) can extend the lifespan of your tracks to 10-15 years. For a complete checklist, read the ultimate guide to preventative garage door care.
Conclusion
A “rogue” garage door is usually just a door that’s lost its way. By performing a careful garage door track adjustment, you can restore smooth, quiet operation to your home and prevent expensive damage to your opener and panels.
At Matrix Garage Doors, we’ve spent twenty years helping our neighbors in Columbus, OH, and surrounding areas like Dublin, Westerville, and Hilliard keep their homes secure. We are a family-owned business committed to 24/7 emergency service and total customer satisfaction.
If your tracks are bent beyond repair, or if you’d simply prefer a professional touch to ensure your door is perfectly balanced, we’re here to help. Schedule your garage door repair in Hilliard, OH or any of our Central Ohio locations today, and let’s get your door back on the right track!