Garage Spring Fix: Safe 2025 DIY Guide
Why a Garage Spring Fix Can’t Wait
A garage spring fix is one of the most urgent repairs a homeowner can face. When a spring breaks, your garage door becomes nearly impossible to open safely. That 200 to 400-pound door can trap your car or pose a serious safety hazard to your family.
Quick Answer: Can You Fix a Garage Spring Yourself?
- Extension Springs: Possible for experienced DIYers with proper safety equipment, but still risky.
- Torsion Springs: Extremely dangerous—these springs are under 400+ pounds of tension and can cause severe injury or death.
- Best Option: Professional repair typically costs $200-$350 and takes under 90 minutes, eliminating all safety risks.
- If You Must DIY: Never use screwdrivers or improvised tools; invest in proper winding bars ($25) and follow every safety step precisely.
Warning: Garage door springs cause thousands of injuries each year, a fact highlighted by organizations like the U.S. Consumer Product Safety Commission. Even professionals who work with these systems daily treat them with extreme caution.
Garage door springs are rated for about 10,000 cycles (roughly 7-10 years of use). When they fail, they often do so with a loud bang that sounds like a gunshot. This is the sound of stored energy releasing—energy that can easily break bones or worse.
This guide will walk you through the DIY process and help you understand when calling a professional is the only safe choice. We’ll cover the tools, steps, and warning signs that mean you should call for help instead of reaching for your toolbox.
I’m Andrew Hopson from Matrix Garage Doors. Serving the Columbus, Ohio area, I’ve seen the consequences of improper garage spring fix attempts and the relief when we complete the job safely in under an hour. My goal is to help you make the right decision, whether that’s a DIY repair or trusting it to professionals.
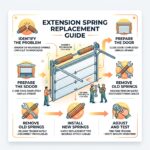
, then evaluate risk factors including door weight over 150 lbs, lack of proper winding bars, uncertainty about spring measurements, visible additional damage to cables or tracks, and personal comfort level; green path leads to possible DIY for extension springs with all safety equipment, red path leads to professional service for torsion springs or any high-risk scenarios; includes cost comparison of $25-100 DIY versus $200-350 professional, time comparison of 4-6 hours versus under 90 minutes, and injury risk rating from high to minimal - garage spring fix infographic")
Understanding Your Garage Door and Its Springs
Your garage door is a sophisticated system where the springs do the heavy lifting. A typical door weighs 130 to 400 pounds, and without working springs, your opener would quickly burn out. The springs counterbalance the door’s weight, making it feel light enough for the opener or for manual operation.

Springs are rated for about 10,000 cycles (one open/close action), lasting roughly 6-10 years. Factors like humidity, rust, and lack of maintenance can shorten this lifespan. The constant use causes metal fatigue, leading to an inevitable break. Recognizing the signs of a failing spring can prevent a major headache.
Common Signs of a Broken Spring
When a spring fails, the signs are usually obvious:
- Loud Bang: The most dramatic sign. A snapping spring releases tension with a sound like a gunshot.
- Garage Door Won’t Open: The opener runs, but the door barely moves. It can’t lift the door’s full weight without the spring’s help.
- Crooked or Uneven Opening: The door hangs crookedly or opens on one side, meaning one spring in a two-spring system has failed.
- Door Falls Fast: The door slams shut instead of closing smoothly, as the springs aren’t controlling its descent.
- Loose Cables: With torsion systems, loose or dangling cables are a direct result of a broken spring releasing tension.
- Opener Straining: Your opener sounds like it’s working harder, a sign of weakened springs that are no longer providing enough assistance.
For other garage door noises, you might find some answers in our guide on how to quiet a noisy garage door.
The Two Main Types of Garage Door Springs
Knowing your spring type is crucial for any garage spring fix.
- Torsion Springs: Mounted horizontally above the door, these springs twist to store energy as the door closes and unwind to help lift it. Common in modern homes in areas like Columbus, Dublin, and Hilliard, they are generally more durable and quieter.
- Extension Springs: Located on the sides of the door, parallel to the tracks, these springs stretch to store energy and contract to lift the door. Often found in older systems, they must have safety cables threaded through them to prevent them from flying across the garage if they break.
Both spring types are under immense tension, making replacement dangerous if not handled correctly.
The Great Debate: DIY vs. Professional Garage Spring Fix
The idea of saving money with a DIY garage spring fix is appealing. While some online sources suggest saving over $500, a professional replacement averages $200-$300. The risks of DIY are substantial, and actual savings may be minimal once you buy tools and account for potential mistakes.
The Dangers of DIY
Garage door springs are high-tension components that can cause severe injury or death if mishandled. We’ve seen lacerations, broken bones, and head injuries from snapping springs or slipping tools. This isn’t theory; it’s a grim reality for many DIYers.
Consider these facts:
- Extreme Tension: Torsion springs are under hundreds of pounds of tension. Improperly unwinding them can cause a violent release of stored energy.
- Incorrect Installation: At least 10% of garage doors have the wrong springs installed, leading to premature failure, opener strain, and an unbalanced, dangerous door.
- Improper Tools: Using screwdrivers or other improvised tools instead of professional-grade winding bars is a recipe for disaster. They can slip or break, sending metal flying.
Why Professionals Are the Safer Bet
Choosing a professional for your garage spring fix offers key advantages:
- Expertise and Training: Our technicians have specialized training to handle spring systems safely and correctly.
- Proper Tools: We arrive with all necessary professional-grade tools and safety equipment.
- Efficiency: A professional replacement typically takes under 90 minutes, often with same-day completion.
- Safety: We follow strict protocols to ensure the job is done without injury or property damage.
- Correct Spring Selection: We accurately measure and select the right spring for your door, ensuring proper balance and longevity.
For more information on our professional services, please visit our Garage Door Services page.
Cost and Time Comparison
Let’s break down the practical differences between DIY and professional spring repair:
| Factor | DIY Garage Spring Fix | Professional Garage Spring Fix |
|---|---|---|
| Estimated Cost | $25 – $100 (for parts and essential tools like winding bars) | $200 – $350 (national average $200-$300; in the GTA, around $270-$350 including service and parts) |
| Time Required | 4 – 6 hours (requires research, parts acquisition, careful execution, and troubleshooting) | < 90 minutes (often completed in a single visit) |
| Risk Level | High (potential for severe injury, property damage) | Low (handled by trained, insured professionals) |
| Required Tools | Specialized (winding bars, clamps, safety gear), often purchased for a one-time use | Included (technicians arrive with all necessary equipment) |
When You Absolutely Must Call a Professional
Attempting a DIY garage spring fix is too dangerous in these situations:
- Lack of Proper Tools: If you don’t have hardened-steel winding bars (1/2″ x 18″ is standard), do not proceed.
- High-Tension Torsion Springs: If you have any doubt about handling the immense tension of torsion springs, call us. The risk isn’t worth it.
- Unsure of Spring Size/Type: If you can’t accurately measure your springs, you’ll likely install the wrong one.
- Door is Excessively Heavy: For doors over 150 lbs, a professional is a must.
- Any Sign of Additional Damage: Damaged cables, bent tracks, or opener issues require a comprehensive assessment.
- Feeling Uncomfortable or Unsure: If you’re hesitant or nervous about any step, please call us. Your safety is paramount.
For common questions and concerns, Check our FAQs.
Gearing Up: Tools and Parts for a Safe Repair
If you’ve assessed the risks and decided to proceed with a DIY garage spring fix (recommended only for extension springs), gathering the right tools is your first critical step. Never improvise; the right tools ensure safety and efficiency.

Here’s a list of essential tools:
- Winding Bars: Critical for torsion springs. Use two 1/2″ x 18″ hardened-steel bars. NEVER use screwdrivers or other tools.
- Safety Glasses: Non-negotiable eye protection.
- Leather Gloves: For grip and hand protection.
- Sturdy Ladder: Position it to the side of the spring ends, never directly in front.
- Adjustable Wrench or Socket Wrench Set: For bolts and nuts.
- Locking Pliers or C-Clamps: To secure the door to the track.
- Measuring Tape or Ruler: For accurate measurements.
- File or Marker: To mark the torsion shaft.
- Rag: For cleaning.
How to Find the Correct Replacement Springs
This is the most crucial step for a successful garage spring fix. The wrong spring is ineffective and dangerous, causing an unbalanced door, opener strain, or another break.
Here’s how to accurately measure your existing springs:
- Measure Spring Wire Size: To determine strength, measure the length of 20 coils in inches, then divide by 20 (e.g., 5 inches / 20 coils = 0.25-inch wire diameter). Measuring 40 coils provides greater accuracy.
- Measure Inside Diameter (ID): Measure the spring’s opening. Common sizes are 1.75″ or 2″.
- Measure Spring Length: Measure the full length of the spring when unwound (or the combined length of the broken pieces).
- Determine Wind Direction (for Torsion Springs): Look at the spring’s end. If the wire points up on the right, it’s a right-hand wind. If it points up on the left, it’s a left-hand wind. Most systems use one of each.
- Weighing the Door (Optional but Recommended): If you suspect the wrong springs are installed (up to 10% of doors have them), weighing the door ensures a perfect match. This is an advanced step often best left to professionals.
Once you have these measurements, you can order replacement springs. However, we recommend consulting a professional if you’re unsure. You can always Contact Matrix Garage Doors for parts and advice before purchasing.
The Step-by-Step Guide to Replacing Garage Door Springs
Whether you’re tackling extension or torsion springs, safety is paramount. We cannot stress this enough: always assume the springs can break or tools can slip.
Safety First, Always!
- Unplug the Opener: Disconnect the opener from its power source to prevent accidental operation.
- Secure the Door: Use C-clamps or locking pliers to clamp the door to the track above the bottom rollers.
- Use Proper Tools: Winding bars are the only safe tool for torsion springs. Never improvise.
For a more general overview of garage door repairs, you can check out our Garage Door Repairs page.
Your First Garage Spring Fix: Replacing Extension Springs
Extension springs are less dangerous to replace than torsion springs but still require caution.
- Open and Secure Door: With the opener unplugged, lift the door fully open. Prop it securely and clamp it to the vertical tracks to prevent it from closing.
- Release Tension: With the door open, springs are relaxed. If a spring isn’t broken, carefully unhook it to release any remaining tension.
- Disconnect Old Springs: Unhook the old or broken spring from its pulley and track hanger.
- Install Safety Cables: If your system lacks them, install them now. Thread a cable through each new spring and secure both ends. This catches the spring if it breaks.
- Attach New Springs: Securely fasten the new springs to the pulley system and track hanger.
- Check Door Balance: Remove clamps and lower the door. Lift it to waist height. A balanced door should stay put. If it falls or rises, adjust the spring tension.
Advanced Garage Spring Fix: Replacing Torsion Springs
This is a high-risk, precision job. If you are not 100% confident, please call a professional.
- Prepare: Unplug the opener, clamp the door, and put on safety glasses and gloves.
- Unwind the Old Spring (if not broken):
- Insert a winding bar into the bottom hole of the winding cone.
- While holding the bar firmly, loosen the two set screws on the cone.
- Insert the second winding bar into the next hole up.
- Carefully unwind the spring a quarter turn at a time, “leapfrogging” the bars. Count the turns (e.g., a 7-ft door needs ~30 quarter turns; an 8-ft door needs ~36).
- Once fully unwound, remove the bars.
- Loosen Cable Drums: Loosen the set screws on the cable drums at both ends of the torsion shaft.
- Remove the Old Spring: Remove the center bracket bolts, then slide the torsion shaft out of the end bearing plates. Slide the old spring(s) off the shaft.
- Install the New Spring(s): Slide the new spring(s) onto the shaft, ensuring correct orientation (winding cone away from the center). Reinstall the shaft and secure the center bracket.
- Reconnect Cables: Ensure lift cables are taut and properly seated in the drum grooves.
- Wind the New Spring(s):
- This is the most dangerous step. Insert a winding bar and wind the spring upwards for the exact number of turns you counted during unwinding.
- Keep constant pressure, leapfrogging the bars with each quarter turn.
- Once fully wound, stretch the spring slightly (~1/4 inch) and firmly tighten the two set screws (1/2 to 3/4 turn past contact) before removing the bars.
- Tighten Cable Drum Set Screws: With cables taut, tighten the set screws on the cable drums.
After the Fix: Maintenance and Final Checks
You’ve completed the garage spring fix, but the job isn’t done. These final steps ensure smooth, safe operation and extend the life of your new springs.
- Test Door Balance: Remove all clamps. With the opener disengaged, lift the door to waist height. A properly balanced door should stay put. If it falls, add a quarter turn of tension to the torsion springs. If it rises, release a quarter turn. Make small adjustments until balanced.
- Lubricate the Spring: Apply a quality garage door lubricant (not WD-40) to the entire spring to reduce friction and prevent rust.
- Adjust Opener Travel Limits: Your opener’s travel and force settings may need adjustment. Consult your opener’s manual.
- Inspect Cables and Rollers: Check lift cables for fraying and rollers for smooth movement. Replace worn parts.
- Annual Maintenance Importance: Regular maintenance prevents future issues. We recommend an annual professional tune-up for your garage door system, or twice a year in colder climates like Columbus, OH. A pro can spot problems early, lubricate parts, and ensure optimal condition.
For more helpful advice on keeping your garage door in top shape, check out our Garage Door Maintenance Tips. We also offer comprehensive Garage Door Services that include planned maintenance to keep your system running smoothly year-round.
Conclusion
A garage spring fix can be a rewarding DIY project if done safely, especially for extension springs. However, the extreme tension in torsion springs makes it one of the most dangerous home repairs. We’ve provided the steps, tool lists, and warnings to help you decide. Your family’s safety is the top priority.
If you feel unsure or overwhelmed by the danger, please call a professional. At Matrix Garage Doors, we’re a family-owned company with two decades of experience serving Columbus, OH, and surrounding areas including Bexley, Blacklick, Canal Winchester, Dublin, Etna, Galena, Grandview Heights, Grove City, Groveport, Hilliard, New Albany, Pickerington, Powell, Reynoldsburg, Upper Arlington, Westerville, and Worthington. We offer 24/7 emergency repair and guarantee your satisfaction. We can complete your garage spring fix safely and efficiently in under 90 minutes.
Don’t let a broken spring compromise your safety. Schedule your professional garage door repair with Matrix Garage Doors today. We’re here to get your garage door “springing” back into action!