Fix Garage Door Spring Cable: 4 Safe Steps
Why You Need to Fix Garage Door Spring Cable Issues Fast
If you need to fix garage door spring cable problems, you’re dealing with a serious issue affecting your garage door’s safety and function. Cables and springs work together to lift a door weighing 200-300 pounds. When a cable frays, snaps, or slips, your door can become stuck, uneven, or dangerous.
Quick Answer: What to Do When Your Garage Door Cable Fails
- Stop using the door immediately to prevent injury or further damage
- Disconnect the automatic opener and secure the door in the closed position
- Do not attempt repair yourself unless you have professional-grade winding bars and safety training
- Call a professional for cable replacement—high-tension springs can cause severe injuries
- Replace both cables at once to ensure balanced operation
Fixing a loose garage door cable seems simple, but it’s extremely dangerous. The cables are under immense tension from the springs, and mishandling them can lead to severe injuries. Garage door repairs, especially involving springs and cables, are a common cause of accidents.
Warning signs your cable needs immediate attention:
- One side of your door hangs lower than the other
- The door won’t open or gets stuck halfway
- You hear loud snapping or grinding noises
- Cables appear frayed, kinked, or are visibly hanging loose
- The door closes too quickly or slams shut
- There’s a visible gap at the bottom when the door is “closed”
I’m Andrew Hopson of Matrix Garage Doors. I’ve helped many Columbus-area homeowners safely fix garage door spring cable issues. Understanding the problem and knowing when to call for help is crucial to avoid injury and costly damage.

Is Your Garage Door in Trouble? Signs of a Failing Cable
A failing garage door cable is a major safety hazard. As a critical part of the counterbalance system, a bad cable compromises the door’s balance, leading to alarming symptoms. Recognizing these signs early can prevent severe damage and injury.
One of the most common signs you need to fix garage door spring cable issues is an uneven or crooked door, often with a visible gap at the bottom when closed. The door might also get stuck, jam, or fall rapidly, which is incredibly dangerous. Listen for loud snapping or grinding noises, which can indicate a broken cable or spring. Finally, a visual check may reveal frayed, kinked, or visibly loose cables. Ignoring these warnings is risky, as a complete failure can cause the heavy door to crash down.
For more information on troubleshooting common garage door problems, you can refer to Identifying a failing garage door. If you’re experiencing any of these issues in Columbus, OH, or surrounding areas like Dublin, Hilliard, or Westerville, it’s time to consider professional help. Our team at Matrix Garage Doors specializes in Garage Door Repair in Columbus, OH and can quickly diagnose and address these concerns.
Understanding the Core Components
Before you fix garage door spring cable problems, it’s crucial to understand the main components that work together:
- Garage Door Springs: The muscle of the system, bearing the door’s weight. Two types: torsion (above the door) and extension (along the sides).
- Lift Cables: Steel wires that connect the spring system to the bottom of the door, translating the spring’s force into vertical movement.
- Cable Drums: Grooved cylinders in torsion systems that wind and unwind the lift cables.
- Pulleys: Used with extension springs to guide the lift cables and distribute force.
- Bottom Brackets: Metal brackets at the bottom corners of the door where the lift cables attach.
- Torsion Tube: A shaft above the door that holds the torsion springs and cable drums.
- Safety Cables: Essential for extension spring systems, these run through the springs to contain them if they break.
When one part, particularly a cable, malfunctions, it throws the entire system off, highlighting the importance of understanding these elements.
Torsion vs. Extension Springs: What’s the Difference for Cable Repair?
Understanding your spring system is fundamental when you need to fix garage door spring cable issues, as the repair process varies significantly. Both torsion and extension springs store immense force and can be dangerous if mishandled.
Torsion Springs:
Mounted on a shaft above the door, these springs twist to store energy and unwind to lift the door.
- Cable interaction: Cables wrap around drums at each end of the torsion shaft.
- Repair considerations: Repair involves releasing immense tension from the springs with special tools before working on the cables and drums.
Extension Springs:
These springs run along the horizontal tracks and stretch to counterbalance the door.
- Cable interaction: Cables run from the door’s bottom corners, over a pulley, and are often attached to the spring.
- Safety cables: These are a critical feature, running through the center of each spring to prevent it from flying loose if it breaks.
- Repair considerations: Repair involves securing the door and unhooking the spring before re-routing or replacing the cable.
Here’s a quick comparison:
| Feature | Torsion Springs | Extension Springs |
|---|---|---|
| Location | Mounted above the door, on a metal shaft | Along the sides of the door, parallel to tracks |
| Operation | Twist and coil to store energy | Stretch and contract to store energy |
| Cable Interaction | Cables wrap around drums on the shaft | Cables run through pulleys and the springs |
| Safety Feature | Generally considered safer due to mounting | Require safety cables to prevent spring recoil |
| Cable Repair Focus | Manipulating cables on drums, spring tension | Re-routing cables through pulleys, spring tension |
For more detail on different spring types, you can explore resources like extension springs and articles discussing types of garage door components. Regardless of your spring type, safety is paramount.
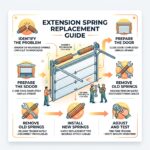
How to Fix a Garage Door Spring Cable: A Step-by-Step Guide
While a DIY fix for a garage door cable seems like a money-saver, it’s extremely dangerous. The springs are under immense tension to lift a 200-300 pound door, and mishandling them can cause severe injury. This guide is only for those who are mechanically experienced, have the correct professional tools, and fully understand the risks. If you have any doubts, call a professional. Proceed with extreme caution.

Preparation: Gather Your Tools and Safety Gear
Proper preparation is non-negotiable for safety. Gather the following equipment before you begin.
Essential Tools:
- Winding Bars (for torsion springs): Absolutely critical. NEVER use screwdrivers or other makeshift tools. Professional hardened-steel winding bars are a must.
- C-Clamps or Locking Pliers (at least two): To secure the garage door to the track.
- Wrench Set: For loosening and tightening bolts.
- Pliers: For general use.
- Screwdriver (flathead and Phillips): For various fasteners.
- Sturdy Ladder: Position it to the side of the spring ends, not directly in front.
Essential Safety Gear:
- Heavy-Duty Leather Gloves: To protect your hands.
- Safety Goggles or Glasses: To shield your eyes.
- Work Boots: To protect your feet.
Never compromise on safety gear when dealing with garage door springs and cables.
Step 1: Secure the Door and Release Spring Tension
This is the most critical and dangerous step. Improperly releasing spring tension can cause severe injury.
- Disconnect the Opener: Unplug the garage door opener. Pull the emergency release cord to detach the door from the opener.
- Close the Door Fully: Close the door completely. This is the safest position for the repair. Get help if the door is stuck open.
- Clamp the Track: Clamp the door to the track on both sides using C-clamps or locking pliers just above a roller. This prevents the door from moving unexpectedly.
- Release Spring Tension (Torsion Springs):
- Locate the winding cones on the torsion springs.
- Insert a winding bar into a cone hole. While holding it firmly, loosen the setscrews.
- Insert the second winding bar into the next hole.
- Carefully unwind the spring a quarter turn at a time, alternating the bars. Continue until all tension is released. The spring will exert strong force, so be cautious.
- Release Spring Tension (Extension Springs):
- With the door closed and clamped, you can often work on the cable without fully removing spring tension.
- Carefully unhook the cable from the bottom bracket.
- If you must work on the spring, unhook it from its mount, but be aware it’s still under tension. Ensure safety cables are intact.
For detailed instructions on this process, refer to guides like How to Repair Garage Door Springs and Cables.
Step 2: Loosen the Drums and Replace the Cable
With the door secured and tension released, you can now replace the cable.
- Loosen Set Screws on Cable Drums (Torsion Systems): Use a wrench to loosen the setscrews on the cable drums at each end of the torsion tube.
- Disconnect Old Cable: Unthread the old cable from the drum and detach its looped end from the hook on the bottom bracket. Remove any snapped pieces.
- Thread New Cable: We always recommend replacing both cables at once for even tension. Thread the new cable, ensuring it’s routed correctly without rubbing against the doorjamb or rollers.
- Wind Cable onto Drum (Torsion Systems): Secure the cable end to the drum and wind it tightly and neatly into the grooves.
- Secure to Bottom Bracket: Attach the other end of the cable to the bottom bracket, ensuring it is snug.
- Ensure Correct Routing: Double-check that both cables are routed correctly and are not tangled or rubbing on other parts.
Step 3: Restore Tension and Check Alignment
This step is crucial for balanced and safe operation.
- Tighten the Cable: Apply initial tension to the new cable. For extension systems, make sure the cable is taut. For torsion systems, you’ll re-tension the springs.
- Adjust Spring Tension (Torsion Springs):
- Use your winding bars to re-tension the torsion springs, following manufacturer recommendations. A general guideline is 30 quarter turns for a 7-ft. door and 36 for an 8-ft. door.
- Wind the springs by “leapfrogging” the winding bars until the correct number of turns is achieved.
- After winding, stretch the spring about 1/4 inch from the center by tapping the winding bar before tightening the setscrews securely.
- Tighten the setscrews on the winding cones firmly.
- Ensure Equal Tension on Both Sides: Both cables and springs must have equal tension to prevent an unbalanced door and future damage.
- Check Cable Alignment on Drums/Pulleys: Check that cables are seated correctly in the drum grooves or pulleys.
- Verify Door Balance: A properly balanced door is essential for smooth operation. We serve homeowners in Dublin, OH, and can help ensure your door is balanced correctly. You can learn more about our services at Garage Door Repair in Dublin, OH.
Step 4: Test the Garage Door
Now it’s time to test your work safely.
- Remove Clamps: Carefully remove the C-clamps or locking pliers from the track.
- Manually Test Door: Manually lift the door 3 feet. It should stay in place. If it falls, add spring tension; if it rises, reduce tension. Adjust in quarter-turn increments until balanced.
- Check for Balance and Smooth Operation: Manually open and close the door, checking for smooth, even movement without jerking or sticking.
- Reconnect Opener: Plug the opener back in and re-engage the trolley by pulling the emergency release cord until it clicks.
- Test with Opener: Test the door several times with the opener. Watch for smooth operation and listen for unusual noises. If you’re in Hilliard, OH, and encounter issues, our team is ready to help with Garage Door Repair in Hilliard, OH.
The Big Question: When Should You Call a Professional?
While we’ve provided steps on how to fix garage door spring cable problems, it’s crucial to know when a DIY approach is unsafe. The garage door system operates under extreme tension, making it inherently dangerous for untrained individuals.
Here’s why calling a professional is often the best decision:
- High-Tension Springs: Springs store immense energy. Mishandling them can cause severe injury or death. Spring repair is notoriously dangerous.
- Lack of Proper Tools: This job requires specialized tools like winding bars, which are not interchangeable with screwdrivers. Replacement parts can also be difficult for homeowners to source.
- Risk of Severe Injury: The combination of a heavy door and high-tension parts creates a lethal risk. A snapped component can cause the door to crash or parts to become dangerous projectiles.
- Complex Systems: The root cause might not be the cable itself but a misaligned track or worn pulley. A pro can diagnose the entire system.
- Heavily Damaged Door: If the door is bent, off-track, or has multiple broken parts, a DIY fix is unsafe and can worsen the damage.
- If You Are Unsure: Your safety is paramount. If you feel uncomfortable or lack confidence at any point, stop and call a professional. This is not a beginner-friendly DIY project.
At Matrix Garage Doors, we offer comprehensive Garage Door Services and Repairs throughout Columbus, OH, and nearby communities. If you’re unsure about the repair, it’s safer to call us.
Common Mistakes When You Fix a Garage Door Spring Cable
It’s easy to make critical errors when you attempt to fix garage door spring cable problems. These mistakes can compromise your safety and lead to more costly repairs.
Here are some common pitfalls to avoid:
- Skipping Safety Steps: Forgetting to unplug the opener, clamp the door, or wear safety gear puts you at immediate risk.
- Using Incorrect Tools: As we’ve emphasized, “NEVER use screwdrivers, pin punches or pliers handles to wind or unwind a torsion spring. Trust us: This is the best way to wind up in the hospital. Don’t even think about doing this job without a proper set of winding bars.”
- Uneven Tension: Not balancing tension on both sides will cause a crooked door, leading to further damage and component failure.
- Over-Tightening Cables: Excessively tight cables strain the system, causing difficult operation and premature wear.
- Replacing Only One Cable: Cables wear out at a similar rate. Always replace them in pairs to maintain balance and prevent the other from failing soon after.
Avoiding these mistakes is crucial. When in doubt, a professional ensures the job is done correctly and safely.
How to Prevent Future Cable Problems
Regular maintenance is key to prolonging the life of your garage door cables and preventing dangerous issues.
Here’s how to keep your cables in top shape:
- Regular Inspection: Monthly, visually inspect cables for fraying, rust, or kinks. Ensure they are seated correctly on drums/pulleys and listen for unusual noises.
- Lubrication: Every few months, lubricate cables, drums, and springs with a silicone-based lubricant to reduce friction and prevent rust. Find more tips in our Garage Door Maintenance Tips.
- Check for Rust: Rust weakens cables. Address it with lubrication, and replace cables if they appear significantly corroded.
- Check Door Balance: Periodically test the door’s balance. An unbalanced door strains all components and requires immediate attention.
- Annual Professional Check-up: Schedule an annual professional inspection. A technician can spot subtle issues, perform preventative maintenance, and ensure long-term safety and reliability in areas like Pickerington, Powell, and Reynoldsburg, OH.
Frequently Asked Questions about Garage Door Cable Repair
We often get questions from homeowners in Columbus, OH, and surrounding communities about their garage door cables. Here are some of the most common ones:
How often should I inspect my garage door cables?
We recommend a visual inspection monthly for fraying, rust, or kinks. Also, check that cables are seated correctly on their drums or pulleys and listen for unusual noises. For a thorough assessment, schedule a professional inspection annually to catch subtle issues and perform preventative adjustments. For more tips on keeping your garage door quiet and well-maintained, check out our guide on Squeaky Garage Door Fix: How to Quiet a Noisy Garage Door and When to Call a Pro.
Is it safe to fix a garage door spring cable myself?
We strongly advise against it unless you are a trained professional. The springs are under extreme tension to lift a 200-300 pound door, and mistakes can lead to severe injury or death. Garage door cable replacement is not a DIY-friendly project and is best left to professionals if you have any doubts.
Should I replace both garage door cables at the same time?
Yes, always replace both cables at once. Cables experience similar wear and tear. Replacing only one creates an imbalance, putting extra strain on the new cable and causing uneven operation. Replacing both ensures balance, safety, and longevity.
Your Safety Comes First: Trust the Experts
When it comes to your garage door, safety should always be your top priority. Attempting to fix garage door spring cable issues without the proper training, tools, and understanding of the immense forces at play can lead to severe injury, costly damage, and ongoing frustration. We’ve seen the dangers of mishandling these powerful systems, and we genuinely want to ensure the well-being of our community in Columbus, OH, and all the surrounding areas we serve, including Bexley, Blacklick, Canal Winchester, Etna, Galena, Grandview Heights, Grove City, Groveport, New Albany, and Worthington.
At Matrix Garage Doors, we understand the urgency and complexity of garage door cable repairs. As a family-owned company with two decades of experience, we provide prompt, professional, and reliable 24/7 emergency residential garage door repair, installation, and maintenance services. Our skilled technicians are equipped with the specialized tools and expertise to safely diagnose and repair any garage door issue, guaranteeing your satisfaction and, most importantly, your safety.
Don’t let a faulty garage door cable compromise your home’s security or your family’s safety. For expert assistance with your garage door, contact us for professional garage door repairs. We’re here to ensure your garage door operates smoothly, safely, and reliably for years to come.