Garage Door Repair and Replacement Parts for Every Homeowner
Why Understanding Garage Door Components Matters for Every Homeowner
Garage Door Part Repair & Replacement can feel overwhelming when you’re staring at a door that won’t budge or makes alarming noises. Here’s what you need to know right away:
Quick Component Identification Guide:
- Torsion springs (above the door) – Most likely to break, extremely dangerous to replace yourself
- Extension springs (on sides) – Also under high tension, require professional handling
- Rollers and hinges – Safe for DIY replacement, often cause noisy operation
- Lift cables – Frayed or snapped cables need immediate professional attention
- Weather stripping – Easy DIY replacement, prevents drafts and pests
- Opener gears and sprockets – Moderate DIY difficulty, common wear items
- Photo-eye sensors – Simple to test and align, critical for safety
- Bottom seals – Straightforward DIY replacement
When to Call a Pro vs. DIY:
- DIY-safe: Light bulbs, remote batteries, weather seals, routine cleaning
- Professional only: Springs, cables, structural repairs, panel replacement
Garage doors operate under extreme tension and weigh hundreds of pounds. According to industry data, doors typically last 15 to 30 years depending on maintenance—but individual parts fail much sooner, especially in Ohio’s variable climate where humidity causes wood to swell and metal to rust.
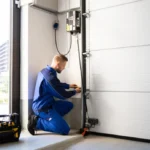
Most homeowners can handle basic maintenance and simple replacements like rollers or weather stripping. But high-tension components like torsion springs can cause serious injury or death if mishandled. Even professional technicians use specialty tools like winding bars and follow strict safety procedures.
The good news? Identifying which part failed is usually straightforward once you know what to look for. A broken spring leaves visible gaps in the coils. Frayed cables show loose wire strands. Worn rollers wobble or make grinding sounds. This guide will walk you through recognizing these signs and deciding whether to grab your toolbox or call for backup.
I’m Andrew Hopson, and at Matrix Garage Doors, I’ve seen every type of Garage Door Part Repair & Replacement scenario across the Columbus area—from simple roller swaps to complex spring replacements. My goal is to help you understand when a repair is within your skill level and when professional help protects both your safety and your investment.

Identifying Common Components for Garage Door Part Repair & Replacement
When your garage door stops working, the first step is knowing what you’re looking at. Think of your garage door as a giant machine with many moving parts that all need to play nice with each other.
The most critical parts are the springs. You likely have either torsion springs, which are mounted on a bar above the door, or extension springs, which run along the upper tracks on the sides. Springs do the heavy lifting, counterbalancing the weight of the door so it feels light enough to open. If you’re dealing with a broken spring, you’ll need a Garage Spring Fix before the door will move again.
Other key players include:
- Rollers: These are the small wheels that allow the door to slide smoothly along the tracks.
- Hinges: These connect the door sections, allowing them to bend as the door moves up the curved part of the track.
- Lift Cables: These high-tension steel wires work with the springs to pull the door up. If one snaps, it’s a major safety hazard. Check out The Ultimate Guide to Fixing a Snapped Garage Door Cable for more on this.
- Tracks: These are the metal “rails” that guide the rollers.
- Weather Stripping and Bottom Seals: These rubber or vinyl strips keep the Ohio rain, snow, and pests out of your garage.
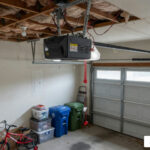
- Opener Gears and Sprockets: Inside your motor unit, these plastic or metal gears can strip over time, causing the motor to hum without moving the door.
- Photo-Eye Sensors: Located at the bottom of the tracks, these “eyes” use an infrared beam to detect obstructions.
At Matrix Garage Doors, we serve the entire Columbus area, including Bexley, Blacklick, Etna, Galena, and Grandview Heights. Whether you’re in Hilliard or Westerville, knowing these parts helps us help you faster.
Signs Your Springs, Cables, or Rollers Need Immediate Replacement
How do you know when Garage Door Part Repair & Replacement is no longer optional? Your door will usually tell you (loudly).
- Gaps in Springs: If you see a two-inch gap in the coils of your torsion spring, it has snapped. You might have heard a loud “bang” from the garage recently—that was the spring letting go.
- Frayed Cables: Look at the steel cables on the sides. If you see loose “hairs” or rusted strands, they are about to snap. You need to Fix Garage Door Spring Cable issues immediately to prevent the door from crashing down.
- Rusted or Wobbly Rollers: If the rollers are vibrating, squealing, or popping out of the track, they are worn out.
- Crooked Door Alignment: If the door looks slanted, it’s likely a Garage Door Off Track issue or a snapped cable on one side.
- Jerky Movement: A door that moves in “fits and starts” usually has a combination of dry tracks and failing rollers.
How to Identify the Correct Parts for Your Door and Opener
Ordering the wrong part is a classic DIY headache. To ensure compatibility, look for the manufacturer label usually found on the inside of the door panels or on the opener motor head. This will give you the brand (like LiftMaster, Genie, or Chamberlain) and the model number.
For springs, you need the wire size, length, and inside diameter. For rollers, measure the diameter of the wheel (usually 2 inches) and the length of the stem. If you’re looking for replacement panels, you’ll need the exact door measurements and the model, as panels from different years often won’t interlock.
If you are unsure, you can always visit a local parts center or consult compatibility charts online. Using the right gear kit for your specific opener model is the difference between a 20-minute fix and a broken motor.
Essential Maintenance and Safety Testing
Maintenance isn’t just about avoiding repairs; it’s about safety. A well-maintained door is a quiet, safe door.
Start by cleaning the tracks. Use a damp cloth to wipe away grease and dirt buildup. Avoid using heavy grease in the tracks, as it actually attracts dirt and causes clogs. Next, perform a hardware tightening. The constant vibration of the door opening and closing can loosen the bolts on the hinges and brackets. Use a socket wrench to snug them up, but be careful not to over-tighten and strip the holes.
For Garage Door Repairs that stay away, lubrication is key. Use a garage-door-specific spray (like Clopay Pro-Lube) on the hinges, rollers (unless they are nylon), and the torsion spring itself. This prevents the metal from becoming brittle and reduces noise.
Finally, check the balance. Disconnect the opener and lift the door halfway by hand. If it stays put, it’s balanced. If it slams shut or shoots upward, the spring tension is wrong and needs professional adjustment. Regular Garage Services and Repairs should always include this balance check.
Testing Safety Features After a Garage Door Part Repair & Replacement
Every time you perform Garage Door Part Repair & Replacement, you must test the safety features. Modern doors have three main safety layers:
- The Photoelectric Sensors: Wave a broomstick in front of the sensors while the door is closing. The door should immediately stop and reverse.
- The Pressure Sensor (Auto-Reverse): Place a 2×4 piece of wood flat on the ground where the door lands. Close the door. When it hits the wood, it should reverse within two seconds. If it keeps trying to crush the wood, your Garage Door Opener Installation or settings need adjustment.
- The Manual Release: Pull the red cord to ensure you can open the door manually in an emergency.
Routine Maintenance to Prevent Frequent Part Failures
Consistency is the secret to a 30-year door. Use this table to stay on track:
| Task | Frequency | Why It Matters |
|---|---|---|
| Visual Inspection | Monthly | Spot frayed cables or loose bolts early. |
| Safety Sensor Test | Monthly | Ensures the door won’t close on pets or kids. |
| Lubrication | Every 6-12 Months | Prevents rust and reduces wear on moving parts. |
| Balance Test | Annually | Prevents the opener motor from burning out. |
| Weather Seal Check | Annually | Saves on energy bills and keeps out moisture. |
By clearing debris from the tracks and tightening bolts, you can prevent most emergency service calls in the Columbus area.
DIY vs. Professional Repair: Safety and Cost Considerations
We love a good DIY project as much as anyone, but the garage door is the heaviest moving object in your home.
The primary risk is tension. Torsion springs are wound tight enough to lift a 300-pound door. If a winding bar slips or a bracket breaks while you are working on it, the force can be lethal. This is why we always recommend a professional to Replace Garage Door Spring components.
DIY-Friendly Tasks:
- Replacing light bulbs or remote batteries.
- Installing new weather stripping or bottom seals.
- Lubricating hinges and rollers.
- Replacing a battery backup unit.
Professional-Required Tasks:
- Replacing torsion or extension springs.
- Replacing or re-tensioning lift cables.
- Replacing entire door panels.
- Adjusting the door’s balance or track alignment.
When to Hire a Professional for High-Tension Parts
If you see a snapped cable or a broken spring, put the tools down. Professionals have specialty tools like winding bars and locking pliers designed specifically for these high-stress environments.
Furthermore, Decoding Garage Door Cable Repair Costs: A Comprehensive Guide shows that hiring a pro can actually save you money. An amateur mistake can damage the opener motor or the door tracks, turning a $200 repair into a $1,500 replacement. Structural integrity is also a factor—if your door is over 15-20 years old, the metal may be fatigued, making it even more dangerous to handle under tension.
Estimated Costs for Common Part Replacements
Budgeting for Garage Door Part Repair & Replacement helps you decide when to fix and when to flip the whole door.
| Part/Service | Estimated Cost (Parts + Labor) |
|---|---|
| Spring Replacement | $150 – $350 |
| Roller Replacement (Full Set) | $100 – $200 |
| Single Panel Replacement | $200 – $700 |
| Cable Repair | $150 – $250 |
| Weather Stripping | $75 – $150 |
| Opener Gear Kit | $100 – $200 |
The Cost to Replace Springs in Garage Door systems often includes a safety inspection of the rest of the door. If you find yourself needing multiple repairs on an older door, a full replacement might offer a better return on investment and improved curb appeal.
Step-by-Step Guide to Replacing Common Parts
If you’ve decided to tackle a DIY-safe repair, preparation is everything.
Essential Tools:
- Socket set and wrenches
- Screwdrivers (Flathead and Phillips)
- Locking pliers (Vise-Grips)
- Level and tape measure
- Safety glasses and heavy-duty gloves
Safety First: Always disconnect the power to the garage door opener before starting any work to prevent the door from moving unexpectedly.
Replacing Rollers, Hinges, and Weather Seals
Replacing Rollers:
- Open the door fully and place locking pliers on the track just below the bottom roller to prevent the door from moving.
- Unbolt the hinge holding the roller.
- Slide the old roller out and the new one in (we recommend nylon rollers for quieter operation).
- Reattach the hinge and move to the next one. Never unbolt the bottom bracket, as it is attached to the lift cable and is under high tension!
Replacing Weather Seals:
- Slide the old bottom rubber out of the aluminum track at the base of the door.
- Clean the track of any dirt or debris.
- Lubricate the new rubber seal with a bit of soapy water to help it slide.
- Pull the new seal through the track and trim the excess.
Addressing Snapped Cables and Opener Gears
While cable replacement is best left to pros, understanding the process helps you spot issues. Cables must be routed precisely around the drums and attached to the bottom brackets while the springs are unwound.
For opener gears, the process involves:
- Opening the motor casing.
- Removing the drive chain or belt.
- Removing the old gear and sprocket assembly.
- Installing the new gear kit and applying the included grease.
- Re-tensioning the chain and testing the travel limits.
Frequently Asked Questions about Garage Door Parts
Is it safe to replace my own garage door springs?
No. Torsion and extension springs are under extreme tension. Without the proper training and tools, they can cause severe injury if they snap or if a winding bar is released prematurely. Always call a professional for spring work.
How do I know if I should replace one panel or the whole door?
If the damage is limited to one section (like a minor dent from a car) and the door model is still in production, replacing the panel is cost-effective ($200-$700). However, if the door is over 15 years old, matching the panel is difficult, and the cost of the panel plus labor may approach the cost of a brand-new, more efficient door.
What tools are essential for basic garage door part repairs?
For basic tasks like tightening hinges or replacing rollers, you need a socket set, locking pliers, a screwdriver, and a ladder. For safety, always wear gloves and eye protection.
Conclusion
At Matrix Garage Doors, we believe that a little knowledge goes a long way in keeping your home safe and functional. Whether you are performing routine maintenance or need an emergency Garage Door Part Repair & Replacement, our family-owned team is here to help. We provide 24/7 emergency service throughout the Columbus, OH area, ensuring that a broken spring or snapped cable doesn’t keep your car held hostage in the garage.
We pride ourselves on professional installation and a customer satisfaction guarantee that has served our neighbors for two decades. Don’t let a noisy or broken door stress you out. Schedule your Garage Door Part Repair & Replacement today and let us handle the heavy lifting!