Garage door extension spring replacement size: 3 Critical!
Why Getting the Right Garage Door Extension Spring Replacement Size Matters
Garage door extension spring replacement size is determined by three critical factors: your door’s weight, your door’s height, and the spring’s physical dimensions. Here’s what you need to know:
Quick Sizing Guide:
- Weigh your door – Most accurate method (125-250 lbs for single doors, 250-500 lbs for double doors)
- Measure your existing spring – Wire diameter, inside diameter (ID), and un-stretched coil length
- Check the color code – DASMA color coding provides a quick reference, but verify with weight
- Match to door height – 7-foot and 8-foot doors require different spring lengths
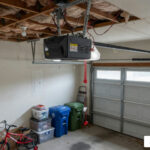
Your garage door likely weighs between 125 and 250 pounds if it’s a single door, or 250 to 500 pounds for a double door. The extension springs mounted above your horizontal tracks on each side are what make it possible to lift that weight safely and smoothly. These springs stretch and contract with every cycle, counterbalancing your door’s weight so you can open it with minimal effort—whether manually or with an opener.
Getting the size wrong creates serious problems. Springs that are too small won’t lift your door properly, putting excessive strain on your opener and creating a safety hazard. Springs that are too large can cause your door to fly open forcefully or become difficult to close, potentially causing injury or property damage. Most extension springs are rated for about 10,000 cycles, which translates to 7-12 years of typical use, so replacement is an inevitable part of garage door maintenance.
This guide walks you through three proven methods for determining the correct spring size, explains the step-by-step replacement process, and helps you understand when to tackle this job yourself versus when to call a professional. You’ll learn how to measure your existing springs, decode the DASMA color system, and—most importantly—how to accurately weigh your door for perfect spring selection.
I’m Andrew Hopson, and I’ve spent years helping Columbus homeowners restore safety and balance to their garage doors through proper garage door extension spring replacement size selection and professional installation. At Matrix Garage Doors, we’ve seen how the right springs transform a struggling door into one that operates smoothly and safely for years to come.
 and double doors (250-500 lbs), Door Height illustrated with a 7-foot and 8-foot door comparison, and Spring Length depicted with measurements of wire diameter, inside diameter, and coil length, all connected by arrows pointing to a correctly sized extension spring - garage door extension spring replacement size infographic")
Garage door extension spring replacement size terms simplified:
Understanding Your Springs and Spotting Trouble
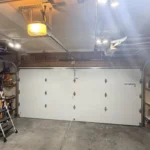
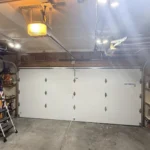
Before we dive into the nitty-gritty of garage door extension spring replacement size, let’s first understand what these unsung heroes do and how to tell if they’re in distress. Extension springs are the workhorses of your garage door system. Located above the horizontal tracks on either side of your garage door, they stretch and contract as the door opens and closes, providing the necessary counterbalance to make even the heaviest doors feel light as a feather.
Signs of a Failing Spring
Your garage door isn’t shy about telling you when something’s wrong, especially with its springs. Here are the tell-tale signs that your extension springs might be failing and need attention:
- A Loud Bang from the Garage: This is often the most dramatic and unmistakable sign. If you hear a sudden, sharp “bang” from the garage, it usually means a spring has snapped. It can be quite startling!
- A Visible Gap in the Spring Coil: After the bang, you might notice a distinct separation or gap in the coils of one of your springs. This is a clear indicator of a broken spring.
- The Door Opens Unevenly or Feels Heavy: If your garage door struggles to open, opens crookedly, or feels unusually heavy when you try to lift it manually, it’s a strong sign that your springs are losing their tension or one has broken.
- The Door Slams Shut: A door that closes too quickly or “slams” rather than descending smoothly indicates a loss of spring tension. This is not only annoying but also dangerous.
- Difficulty in Opening or Closing: General difficulty with the door’s movement, whether it’s getting stuck halfway or refusing to move at all, can point to spring issues.
- Slack Cables: If you notice that the cables running from your springs to the bottom of the door are slack or dangling, it means the spring tension has been lost, likely due to a break.

Lifespan of Extension Springs
Like any hardworking component, extension springs have a finite lifespan. Most are rated for approximately 10,000 cycles. A “cycle” means one opening and one closing of the garage door. For the average household, this translates to about 7 to 12 years of reliable service. However, factors like daily usage, maintenance, and even temperature fluctuations can impact this lifespan.
Importance of Safety Cables
When an extension spring breaks, it releases a tremendous amount of stored energy. Without safety cables, a broken spring can whip dangerously, potentially causing damage to your car, walls, or even severe injury to anyone nearby. Safety cables are threaded through the center of each extension spring and anchored to the wall or ceiling, designed to contain the spring if it breaks. If your system lacks these crucial safety devices, we strongly recommend having them installed. It’s a small investment for a significant increase in safety.
Regular maintenance can help identify potential issues before they become major problems. For more tips on keeping your garage door in top shape, check out our Garage Door Maintenance Tips.
How to Determine the Correct Garage Door Extension Spring Replacement Size
Determining the correct garage door extension spring replacement size is the most critical step for a safe and functional garage door. There are three primary methods we use: measuring your existing spring, utilizing the DASMA color code system, and accurately weighing your garage door. While all methods can provide clues, we always emphasize weighing the garage door as the most accurate and reliable approach to ensure a perfectly balanced system.
How to Measure Your Existing Springs
If your springs are still intact (or even if one is broken but you have the other for reference), measuring them can give us a good starting point. Here’s how we approach it:
- Measure Un-Stretched Coil Length: With the spring completely relaxed (not under tension), measure the length of the coiled section from hook to hook. This is the “body” of the spring, excluding any end loops or hooks.
- Measure Inside Diameter (ID): Carefully measure the inside diameter of the spring coils. This can be a bit tricky if the spring is still installed and under some tension, but it’s an important dimension.
- Measure Wire Diameter Using the 10-Coil Method: This is a precise way to determine the thickness of the spring wire. Measure 10 consecutive coils of the spring, pressing them tightly together. Note this measurement, then divide it by 10 to get the wire diameter. For example, if 10 coils measure 1.92 inches, your wire diameter is 0.192 inches.
- Note the Door Height: This is straightforward. Measure the height of your garage door. Most residential doors are either 7 feet or 8 feet tall. This height directly impacts the necessary spring length and stretch.
These measurements, along with the door’s height, are crucial for selecting a spring with the correct physical properties.
For a neutral technical reference on how extension springs work in general, you can also review the overview of extension springs#Extension_springs) on Wikipedia. This background, combined with your specific measurements, helps ensure you choose the right replacement.
Using the DASMA Color Code System
The Door & Access Systems Manufacturers Association (DASMA) has established a color-coding system for garage door springs, which can be a helpful quick reference. Each color typically corresponds to a specific lifting capacity.
Here’s a list of common DASMA extension spring color codes and their approximate corresponding weights (per pair of springs for a 7-foot high door):
- Tan: 100 lbs, 200 lbs, 300 lbs
- White: 110 lbs, 210 lbs, 310 lbs
- Green: 120 lbs, 220 lbs, 320 lbs
- Yellow: 130 lbs, 230 lbs, 330 lbs
- Blue: 40 lbs, 140 lbs, 240 lbs
- Red: 50 lbs, 150 lbs, 250 lbs
- Brown: 60 lbs, 160 lbs, 260 lbs
- Orange: 70 lbs, 170 lbs, 270 lbs
- Gold: 80 lbs, 180 lbs, 280 lbs
- Light Blue: 90 lbs, 190 lbs, 290 lbs
Limitations of the Color Code: While handy, the DASMA color code system has significant limitations:
- Colors can fade or be inaccurate: Over time, paint can chip, fade, or become obscured by dirt, making identification difficult.
- Colors repeat every 100 lbs: Notice how “Tan” can be 100 lbs, 200 lbs, or 300 lbs. This means a color alone isn’t enough to determine the exact weight capacity. You still need to factor in the door’s actual weight.
- Not all manufacturers follow the DASMA standard: Some older or non-standard springs might not adhere to this system.
Because of these limitations, we use the color code primarily as a secondary verification method, never as the sole determinant for garage door extension spring replacement size.
The Most Accurate Method: Weighing Your Garage Door
For us, accurately weighing your garage door is the most reliable way to determine the correct garage door extension spring replacement size. This method removes all guesswork and ensures we select springs that perfectly counterbalance your door’s actual weight.
Safety Precautions Before Weighing:
This process involves releasing spring tension and potentially moving a heavy door. Safety is paramount!
- Disconnect the garage door opener: Unplug it from the power outlet to prevent accidental operation.
- Release all spring tension: This is a critical step. With the door fully open and secured, we disconnect the existing springs and safety cables. If the springs are still under tension, it’s impossible to get an accurate weight.
- Secure the door: Place C-clamps or locking pliers on the vertical tracks just below the bottom rollers to prevent the door from falling if it’s partially open. If the door is fully open, ensure it’s securely propped.
Step-by-Step Guide to Weighing the Door with a Bathroom Scale:
- Prepare the door: With the opener disconnected and spring tension released, carefully lower the door until it’s resting entirely on the ground.
- Position the scales: Place two bathroom scales on the garage floor, one approximately one-third of the door’s width from one side, and the other one-third from the other side. For narrower doors, a single scale directly in the center might suffice.
- Lower the door onto scales: Carefully lift the door just enough to slide the scales underneath, ensuring the door is fully supported by the scales.
- Record readings: Note the weight displayed on each scale. Add the readings together to get the total weight of your garage door. If using a single scale, take readings from multiple points and average them, or ensure the entire door’s weight is on the single scale.
- Remove scales and secure: Carefully lift the door off the scales, remove them, and secure the door in a safe position.
For an additional neutral reference on door weighing and spring selection charts, you can review this general guide on choosing correct springs. Use it only as a technical reference; always prioritize your door’s actual measured weight and local safety codes.
This precise weight allows us to select extension springs with the exact lifting capacity needed for optimal performance.
Consequences of Using the Wrong Garage Door Extension Spring Replacement Size
Using the incorrect garage door extension spring replacement size has more serious repercussions than just an annoying door. It can lead to safety hazards, accelerated wear and tear on your system, and costly repairs.
-
Springs are too small: If the springs are too weak for your door’s weight, they won’t be able to provide adequate lift.
- Door is difficult to open: You’ll find it heavy and challenging to lift, whether manually or with your opener.
- Puts excessive strain on the garage door opener: Your opener will have to work much harder than it’s designed to, leading to premature motor fatigue and a significantly reduced lifespan for the opener itself. This means more frequent repairs or even early replacement of your opener.
- Increased safety risk: A door that’s too heavy can fall unexpectedly, causing injury or damage.
-
Springs are too large: Conversely, springs that are too strong for your door can create their own set of problems.
- Door is difficult to close: The door will want to “spring back up,” making it hard to keep it closed. Your opener might struggle to pull it down, or it might not close completely.
- Can cause the door to fly open forcefully: When you release the door, it might shoot up with excessive force, potentially damaging the tracks, rollers, or even the door itself.
- Creates a significant safety hazard and damages the door or opener: This forceful movement can cause parts to break, leading to dangerous situations where the door could come off its tracks or components could fail catastrophically.
The bottom line is that accurately sized springs are essential for the safe, efficient, and long-lasting operation of your garage door.
The Replacement Process: Safety, Tools, and Steps
Replacing garage door extension springs is not a task we recommend for the faint of heart. These springs are under immense tension, and mishandling them can lead to severe injuries or even death. We’ve seen the dangers involved, which is why we always emphasize safety.
High Tension Danger: DIY Risks vs. Professional Service
The energy stored in a fully stretched extension spring is considerable. If a spring breaks or is improperly handled during replacement, it can snap, whip, and cause serious damage. While some homeowners might be tempted to tackle this as a DIY project, we strongly advise against it unless you have specialized knowledge, experience, and the correct tools. The risks far outweigh the potential savings.
Professionals, like our team at Matrix Garage Doors, have the training, safety equipment, and expertise to perform spring replacements safely and efficiently. We understand the mechanics, the nuances of spring tension, and how to prevent accidents. When in doubt, always call a pro for Garage Door Repair.
Essential Tools and Materials
If you’re determined to proceed with a DIY replacement (and have carefully considered the risks), here’s a list of essential tools and materials you’ll need:
- C-clamps or Locking Pliers: Absolutely crucial for securing the garage door in the open position.
- Adjustable Wrenches: For loosening and tightening bolts.
- Safety Glasses and Heavy-Duty Gloves: Non-negotiable personal protective equipment.
- New Extension Springs: The correctly sized springs you’ve determined using our guide.
- New Safety Cables: Always replace these when replacing springs. They are your last line of defense in case of a spring break.
Step-by-Step Guide to Replacing Extension Springs
Here’s a general overview of the replacement process. This is a dangerous job, and if you’re uncomfortable at any point, please call us.
- Secure the Door in the Fully Open Position: Open your garage door completely. Use two sturdy C-clamps or locking pliers to firmly secure the door to the vertical tracks, just below the bottom rollers. This prevents the door from falling.
- Disconnect the Opener and Old Spring/Safety Cable: Unplug your garage door opener. With the door secured, disconnect the old spring from its pulley and track hanger. Then, remove the safety cable threaded through the old spring.
- Remove the Old Spring: Carefully unhook the old spring from the track hanger and remove it. Be mindful of any remaining tension.
- Attach the New Spring and Thread the New Safety Cable: Install the new extension spring onto the track hanger. Thread the new safety cable through the center of the new spring, securing one end to the wall or ceiling bracket and the other end to the track hanger, ensuring it’s taut but not under tension from the spring.
- Reconnect All Components: Reconnect the spring to its pulley and ensure all hardware is securely fastened.
- Carefully Remove Clamps and Test the Door Balance: Once both springs are replaced and all connections are secure, carefully remove the C-clamps. Lower the door slowly by hand, then lift it to the halfway point. A properly balanced door should stay in this position without falling or rising.
- How to Adjust Tension for a Perfectly Balanced Door: If the door doesn’t stay put, it needs adjustment. If it falls, the springs are too weak; if it rises, they are too strong. To adjust, open the door completely and secure it again with clamps. Disconnect the safety cable. Adjust the tension by moving the S-hook on the spring to a different hole on the track hanger, or by adjusting the pulley if it has an adjustment screw. Reconnect the safety cable, remove clamps, and re-test. This might require several small adjustments.
Extension Springs: What You Need to Know
Extension springs are a common and effective system for residential garage doors. Understanding their characteristics can help you appreciate their role and why proper maintenance is so crucial.
Here’s a quick look at their key characteristics:
- Location: Extension springs are mounted above and parallel to the horizontal tracks on either side of your garage door.
- Lifespan: Typically rated for 10,000 cycles, translating to 7-12 years of average use.
- Cost: Generally, extension springs themselves are less expensive than torsion springs, and their initial installation can be simpler.
- Safety: They require safety cables threaded through them to prevent dangerous whipping if they break.
- Installation Complexity: While simpler in design compared to torsion springs, their replacement still involves significant danger due to high tension, making professional installation highly recommended.
Extension springs are widely used in residential applications because they are a cost-effective and relatively straightforward system to install. They work by stretching to store energy as the door closes and contracting to release that energy, assisting the opener in lifting the door. We offer comprehensive More info about our Garage Door Services and Repairs for all your needs, including expert extension spring replacement.
Frequently Asked Questions about Extension Springs
We often get questions from homeowners in Columbus, OH, about their garage door extension springs. Here are some of the most common ones:
How does temperature affect garage door extension springs?
Temperature fluctuations can indeed impact the performance of your garage door extension springs. In colder temperatures, metal contracts. This contraction can cause springs to lose some of their tension, potentially leading to a door that feels heavier, opens less smoothly, or struggles to stay balanced. Conversely, in very hot weather, springs can expand slightly, which might cause them to be slightly weaker.
This is why we stress the importance of regular balance checks, especially as the seasons change. If your door feels off or sticky, it might be due to temperature affecting the springs. Sometimes, a simple adjustment can fix it, but other times it might indicate underlying wear. If your door is also making unusual noises, our guide on Squeaky Garage Door Fix: How to Quiet a Noisy Garage Door and When to Call a Pro might offer some additional insights.
Should I replace both extension springs if only one is broken?
Yes, absolutely. If one extension spring breaks, we always recommend replacing both springs at the same time. Here’s why:
- Springs wear at the same rate: Both springs are installed at the same time and undergo the same number of cycles and stress. If one has broken, the other is likely at the end of its lifespan and will fail soon after.
- Mismatched springs cause imbalance: Replacing only one spring will result in one old, fatigued spring and one new, strong spring. This imbalance will cause the garage door to operate unevenly, putting undue stress on the new spring, the opener, and other components. This can lead to premature failure of the new spring and further damage to your system.
- Safety and efficiency: Replacing both ensures your door is properly balanced, operates smoothly, and reduces the risk of another spring breaking unexpectedly.
It’s a small extra cost upfront that saves you from potential headaches, additional repair calls, and safety hazards down the line.
How do I replace the extension spring cable?
Replacing an extension spring cable, especially if it’s frayed or broken, is another task that requires extreme caution due to the high tension involved. The cable works in conjunction with the spring to lift and lower the door. Here’s a simplified overview of the process:
- Close the Door and Disconnect Power: Ensure the garage door is fully closed and unplug the garage door opener to prevent accidental activation.
- Relieve Spring Tension: This is the most critical and dangerous step. The extension springs must be completely relaxed. This usually involves opening the door fully, securing it with C-clamps, and then carefully disconnecting the spring and cable. If you’re not confident in relieving tension safely, please call a professional.
- Remove the Old Cable: Once tension is relieved, carefully disconnect the old cable from the bottom bracket of the door and from the pulley system near the spring. Remove the old safety cable as well if it’s threaded through.
- Thread and Secure the New Cable: Attach the new cable to the bottom bracket. Thread the cable through the pulley at the end of the horizontal track, then through the loop of the extension spring. Ensure the cable runs smoothly without kinks.
- Reattach Safety Cable: Thread a new safety cable through the spring and secure it properly.
- Restore Tension and Test: Carefully reattach the spring to its hanger, remove the C-clamps, and test the door’s balance and operation. Adjust as needed.
Due to the inherent dangers, we strongly advise contacting us for cable replacement. Our expert technicians have the tools and experience to perform this job safely and correctly.
Your Partner for a Safe and Balanced Garage Door
We’ve covered a lot about garage door extension spring replacement size, from identifying signs of wear to the critical steps for accurate sizing and replacement. The key takeaway is clear: accurate sizing is non-negotiable for the safety, efficiency, and longevity of your garage door system. Weighing your door remains the most reliable sizing method, ensuring a perfectly balanced operation.
While DIY replacement of extension springs is technically possible, the risks associated with high-tension components are substantial. We understand the desire to save money, but we prioritize your safety above all else. For residents in Columbus, OH, and surrounding areas like Bexley, Dublin, Grove City, Hilliard, and Westerville, Matrix Garage Doors provides expert and safe spring replacement services. Our team has two decades of experience and is ready to ensure your garage door operates smoothly and safely.
Don’t compromise on safety or the lifespan of your garage door system. For professional and guaranteed service, schedule your garage door repair today! We’re here 24/7 for emergency residential garage door repair, installation, and maintenance, always committed to customer satisfaction.